9.27.2017

How to add parameters in BMW NCS Dummy Software

In order to code the DMB driving lock in the E series, I added the parameters and modified the data value to FF, so I added the parameters many times, so I applied the additional method.

When replacing a battery with an amp that is higher than the original amp, sometimes I need to add a parameter to set the proper ampere .... I do not have to .... But, I want to ....

I can not see the 100 amperes parameter in BMW coding software NCS Dummy.

first

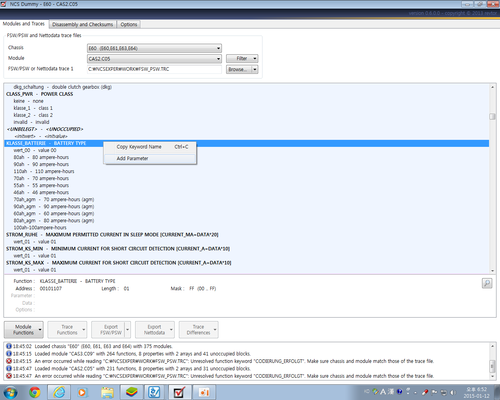
If you search for KLASSE_BATTERIE to set the battery

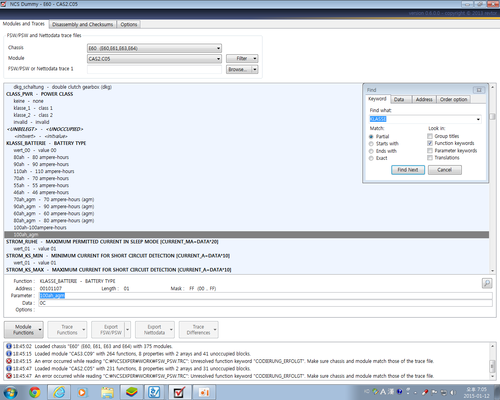
(First picture) KLASSE_BATTERIE - Select BATTERY TYPE, right click on it and select Add parameter to modify the added parameters .... (second, third picture)

Edit the data (fourth picture) .... The modification here seems to be the menu order. 01, 02, 03, ....... 09,0A.0B, 0C.0D, ......

In the DMB lock, I modified the setting value to FF ..... It seems that the order is not so important here. So it makes sense that some people do not need to set it up.

I think the battery should be reset.

Finally (in the fifth figure), press the Module Functions button to select the Update Module.

When you start to update the module, you will be notified that you can not revert anymore.

Now go back and load the modified module and you will see the modified 100 amperes.

I have added two parameters: 100 amps in general and 100 amps in AGM batteries.

BMW ICOM ISTA-D ISTA-P with engineering software INPA Ncs expert, WInKFP
add-parameter-in-ncs-dummy-1

add-parameter-in-ncs-dummy-2

add-parameter-in-ncs-dummy-3

add-parameter-in-ncs-dummy-4

add-parameter-in-ncs-dummy-5
Note: The document was translated from Korean. Credit to ds5ppx.

www.obdii365.com

9.21.2017

V2017.09 BMW ICOM ISTA-D 4.06.31 ISTA-P 3.62.1.003 Software List

Latest V2017.9 BMW ICOM software HDD comes with free BMW Engineer Software for Windows 7 operating system.


Software version:
ISTA-D 4.06.31
ISTA-P 3.62.1.003
VIN: 2017.06.12
Not connected 9000 days remaining


Compatible with: BMW ICOM, ICOM A1, ICOM A2, ICOM A3, and BMW ICOM Next


Software Including:

BMW ETK: 2017.08
BMW KSD: 08.2017 Multilanguage
BMW FSC Navigation Code Generator
BMWAiCoder for BMW Coding 

With free BMW Engineer Software (INPA, NCS, WinKFP, E-Sys 3.27.1, e-sys plus 3.27.1, Ediabas tool32 61.5, BMW FSC code generator, newly added Dr.gini B020 diagnostic software, BMW AiCoder. 

Dr.gini B020 diagnostic software requires Ediabas properly installed and functional with a communication interface ( ICOM, ICOM Next, ENET, PASSTHRU or K+DCAN ),
the BMW manufactured before 2003 are not supported.

Multi-language available in diagnosing, programming and TIS diagram circuit: English, German, Spanish, Russian, Simplified Chinese


V2017.09 BMW ICOM Software Display:
v2017-09-bmw-icom-1

v2017-09-bmw-icom-2

v2017-09-bmw-icom-3

v2017-09-bmw-icom-4

v2017-09-bmw-icom-5

v2017-09-bmw-icom-6

v2017-09-bmw-icom-7

v2017-09-bmw-icom-8
System Requirements:

Dual-core processor, better above I3; over 4G of memory

Support Model:

It is recommended to use Lenovo ThinkPad: T61, T400, T410, T420, T430, X61, X200, X201, X220 X230 and other laptop with Intel chipset, such as I3 I5 / I7 series.

9.13.2017

BMW ICOM Next vs. ICOM A2 vs. INPA vs. ENET cable

Any cost-effective DIY solution of BMW diagnostic/coding/programming?
Yes, first you should know which a BMW ICOM cable you need: K+DCAN or ENET or ICOM A2/ ICOM Next.
 INPA K+DCAN cable
(switch mode)
BMW ENET cableBMW ICOM
Image 
 
 
Price$17.99$11.99$300 around
VehicleFor Exx carsFor Fxx carsFor ALL Exx & Fxx cars
(BMW E, F, G, I, Alpina series cars, MINI and Rolls-Royce from 1985 – 2017)
SoftwareInpa 5.0.2
Ediabas
E sys 3.23.4
Psdzdata
Ista-D
Ista-P
BMW ETK
BMW KSD
INPA
NCS Expert
WinKFP
E-Sys 3.27.1
BMW AiCoder
BMW FSC code generator
DiagnosticYesYesYes
CodingYesYesYes
ProgrammingNoYesYes

In summary,
It depends on your purpose (diagnostic or coding or programming) and model (Exx or Fxx or others).

For Coding, you need different Tools, NCS Expert / SP-Daten for E-Series and E-Sys / PSdZData for F-Series.
All Diagnosis and Coding can be done with cheap DCAN Cable for E-Series and cheap ENET Cable for F-Series.

For Programming (Flashing ECU’s with new Firmware), then you need ISTA/P for for both E-Series and F-Series cars, or you can use WinKFP for E-Series and E-Sys for F-Series. For E-Series Programming, you will need an ICOM, but for F-Series Programming, you can use ENET Cable.

For Exx- Series:
Interface = K+DCAN Cable (OBDII to USB) or ICOM
ECU Data Files = SP-Daten
NCS Expert = Coding Software
WinKFP = Programming (Flashing) Software
EDIABAS = Low-Level ECU Communication Software used by NCS Expert & WinKFP

For Fxx- / Ixx- / Gxx-Series, Mini, & Rolls-Royce:
Interface = ENET Cable (OBDII to RJ45 Ethernet) or ICOM
ECU Data Files = PSdZData
E-Sys = Coding Software
E-Sys = Programming (Flashing) Software

About: BMW ICOM
ICOM A (also ICOM A2, ICOM A3, ICOM Next A): main interface
ICOM B: adapter for programming multimedia in E series
ICOM C: adapter for old BMW with round 20 pin diagnostic plug
ICOM D: adapter for motorcycles
ISTA+ (AKA Rheingold or ISTA-D)
DIAGNOSTICS for All Vehicles
PROGRAMMING for F/I/G/RR & MINI, but requires an ICOM
ISTA-P
PROGRAMMING traditionally for all chassis, but is being phased out by August 2017, except for legacy E-series.
Replacement ECU’s must be NEW

YOU HAVE TO KNOW before you buy ICOM A2 or ICOM A3 or ICOM Next:

BMW ICOM NEXT vs the old ICOM
-> much faster in BMW F and G series ..
-> supports gigabit Ethernet too to be future proof, there currently is not gigabit Ethernet protocol defined yet for autos. Also it has USB3.0 instead of USB2.0 and a better wifi card. 


ICOM NEXT A vs ICOM A2

-> more stable during programming
-> be necessary for the future Gbit cars
-> faster start-up times and high throughput
-> through high-performance,low-power ARM SoC
-> improved handling
-> more flexible OBD cable
-> lighted button for logs

ICOM A vs ICOM A2 vs ICOM A3

Modified ICOM A2 for vehicles with OBD access receives a significantly more powerful processor and more storage capacity. And robust aluminium case will help to avoid damage when using in harsh environments. It works better in cooling, runs faster and works more stable, not easier broken than older ICOM A.

ICOM A3 can program all units for all BMW series expect media system, and work more stable and has stronger compatibility than ICOM A2, A1.
http://obd365.blogrip.com/2017/09/14/bmw-icom-or-kdcan-cable-or-enet-cable/

9.11.2017

How to resolve errors caused by DME / DDE module initialization

Here is the expert solution to BMW DME/DDE module initialization  problem

(Note: The document was translated from Korean. Credits to Mr. JIHUNX)

Background:

The DME(Digital Motor Electronics module of the BMW automobile is a very important module that controls the main operation of the engine (Diesel vehicles include DDE and Digital Diesel Electronics modules). Unlike other modules, the DME / DME2 / DDE module must be coded with the power turned on (ACC On) without coding while the power is turned on at the time of coding. If the initialization is done by pressing the button with the ignition on Codeor the coding is done, the DME module will be blown and various warning lights will appear. Most of the beginner coders initialize ECUs it, and after selecting all , Code it seems that these problems are caused by pressing. Code If you need to initialize by pressing Code, select the individual module and press to initialize it for each individual module.
bmw-DME-module-initialization-1
If the DME module is blown, the starting will be turned off while coding, and if you try to start, there will be a phenomenon that the driving device error will not start. Then, various warning lights are turned on as shown in the figure below.
bmw-DME-module-initialization-2

Solution

By default, the preparation process is the same as the BMW ENET E-sys software coding procedure. I am going to tell you about the theory, not the actual experience. Please note that the names and numbers of the coding files are different because they are synthesized by combining all screenshots. 
  1. Read SVT (VCM) Activate FA (VO) => Read SVT (VCM)) , then proceed to the process (ACC ON state ).
  2. SVT With the DME module selected in the area, Detect CAT for SWE click the button on the right .
bmw-DME-module-initialization-3
  1. After selecting the most recent CAFD OK, press. The current F020-13-11-504 CAFD list is selected because it is the most recent version on the current capture screen .
bmw-DME-module-initialization-4
  1. The DME module will probably have been changed to a blue, red color folder on the SVT list as shown below.
bmw-DME-module-initialization-5
  1. DME With the module name selected Code, click the button on the right screen . Or you can DME right-click on the module name Code and select the same.
bmw-DME-module-initialization-6
  1. If you continue to coded while the green bar is stretched as if you are coding, it is restored normally.

9.04.2017

Set up DHCP server on external router for BMW ICOM ECU flash

I made a definitive guide of how to set up DHCP server on an external router for BMW ECU flashing with BMW ICOM diagnostic tool.

Why is this necessary?
When flashing specific modules (KOMBI, NBT,..) on F and G series, the
ICOM switches between different IP addresses and therefore loses sync with the computer. In order to resolve this issue, there needs to be a DHCP server between the ICOM and PC, which redirects any traffic on the selected MAC address (in this case the ICOM’s MAC address) to a specified IP address.

All three connected devices (PC, ROUTER and ICOM incl. icom a1icom a2icom next) need to be set to DHCP.

In this tutorial, I used an old D-Link DIR-300 router. You can use any router that supports setting its’ netmask to 255.255.0.0 and has the capability for DHCP server.

Step-by-step instructions:

Before this, you need to turn off your Windows Firewall !

Step 1: Configure your PC to DHCP

Go to Control Panel > Network Connections > Ethernet>Properties
control-panel
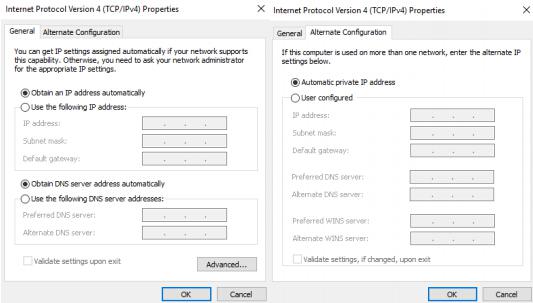
Select: Internet Protocol Version 4 (TCP/IPv4) and click Properties.
Both tabs need to be as follows:
internet-protocol
When you now connect something with LAN cable, your Ethernet card under Control Panel > Network Connections > Ethernet>Details should now show DHCP Enabled Yes.
show-dhcp-enabled
Step 2: Configure your ICOM to DHCP

Connect your ICOM to the car’s OBD2 port, wait for it to power on and connect it to your PC via LAN cable. Wait a minute or two to be recognized by the PC.
In iToolRadar or Dr. Gini take a look at your ICOM’s assigned IP address. Copy it into your web browser (I use Google Chrome) and at the end add :60080 (this is the port fort the settings).

Example: http://169.254.97.140:60080/
You will then be asked for a Login username and password.
Username: root Password: NZY11502
enter-user-name-and-password
Under LAN settings make sure your ICOM is set to DHCP. Make a note of the ICOM’s subnet mask.

Step 3: Configure your router for DHCP server.

Disconnect ICOM, power up your router and connect it to your PC via LAN cable. Use the router’s LAN ports.
Open Command Prompt (CMD) and type in ipconfig.
You will see a list of your Connection Cards configurations. Under LAN you will see your router’s IP addresses. Copy the Default gateway IP address into your internet browser. This time you do not add any port number at the end. P.S.: If there is no Default gateway listed, make a hard reset of your router with its’ physical reset button.
Type in the username and password of your router. The default username is usually admin and the password is either nothing/blank or also admin.
Now go under advanced and turn off your router’s firewall. In my case it is under ADVANCED>Firewall&DMZ. Disable SPI, save settings.
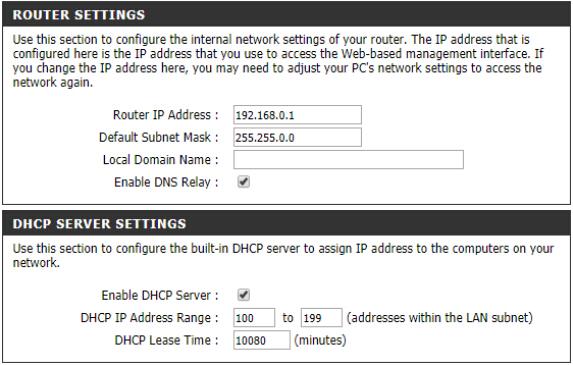
Then go to LAN settings and assign 192.168.0.1 with subnet mask
255.255.0.0 to your router.

Important: The subnet mask of the router needs to match ICOM’s subnet mask. Enable DHCP server.
Set the pool to be between 100 and 199.
Save settings and reboot your router.
The DHCP Client list should now be populated with your PC’s address. If not, physically power off and on your router (maybe also PC), then check again.

Settings should look like this:
dhcp-client
router-settings
And your PC listed under DHCP client List.

Step 4: Connect everything together

Power off your router, disconnect it from your PC, disconnect your ICOM from the car and LAN. No device should be connected via LAN to anything at this point and both router as well as ICOM should be powered off.

Follow this exact order:
 Power on your router. Wait 2 min for it to fully boot up.
 Connect ICOM to the car’s OBD2 port and wait for it to fully boot up.  Connect ICOM to the router via LAN cable. Use the LAN ports on the router (port number does not matter). Wait a minute or two.
 Connect your PC to the router via LAN cable. Use the LAN ports on the router (port number does not matter). Wait for the PC to recognize the router.
 In web browser connect to your router’s settings menu as described in step 3. Take a look at the DHCP Client list under LAN settings. Your ICOM and PC should be listed.
 Open iToolRadar or Dr. Gini and you should see your ICOM listed with an IP address of 192.168.0.x, where x is a number between 100 and 199.

This is it. You can now open ISTA/D and run a vehicle test with your BMW ICOM. If ISTA/D recognizes your vehicle fully, you are all set. If not, there is a problem and you should not attempt to flash anything.


Good reference may help you out:

How to setup router for Programming KOMBI and NBT

Router DHCP, Icom DHCP and Windows Ethernet: automatic dhcp

First of all the ICOM should be configured this way:
ICOM Config
ConnectionMode = STATIC_IP
Ip = 192.168.68.85
Netmask = 255.255.255.0
Gateway = 192.168.68.99
DHCPSRV.INI
[SETTINGS]
IPPOOL_1=192.168.68.1-254
IPBIND_1=192.168.68.99
AssociateBindsToPools=1
Trace=1
DeleteOnRelease=0
ExpiredLeaseTimeout=3600
[GENERAL]
LEASETIME=86400
NODETYPE=8
SUBNETMASK=255.255.255.0
NEXTSERVER=192.168.68.99
ROUTER_0=192.168.68.1
[DNS-SETTINGS]
EnableDNS=0
[TFTP-SETTINGS]
EnableTFTP=0
ROOT=C:\Users\Osx\Desktop\DHCP\wwwroot
WritePermission=0
[HTTP-SETTINGS]
EnableHTTP=0
ROOT=C:\Users\Osx\Desktop\DHCP\wwwroot
[00-01-A9-00-EE-E9]
IPADDR=192.168.68.1
AutoConfig=06/26/2016 12:41:32
Hostname=ICOM1120134
LeaseEnd=1467070189
Windows Ethernet config:
“Use the following IP Address”
IP 192.168.68.99
Subnet mask 255.255.255.0
Hope this help.