1.17.2019

V2018.12 BMW E/F scanner Software Free Download

The latest and most stable software version of BMW E/F Scanner goes to V2018.12.  Here obdii365.com provides software download for free.

File including
v2018-12-bmw-e-f-scanner-download-1

v2018-12-bmw-e-f-scanner-download-2

v2018-12-bmw-e-f-scanner-download-3

Software version: BMW-Explorer V 18.12.03
Added new versions of  SWFL for FEM/BDC and DME/DDE
Fixed programming FEM/BDC/EGS/DME/DDE
Operating system: Windows 7 – Windows 10
Language: Russian /English
Function: Full version supports BMW Diagnosis + IMMO key programming + Mileage Correction + Coding
Full Version Feature:
1.Basic features module
3. E-series Coding module
3.E-series CAS1, CAS2, CAS3, CAS3+  mileage Reset
4.E-series keyprog module
5.FEM/BDC mileage module
6.F-series mileage correction module
7. FLASH calibration READ/WRITE calibrations for F and G series models
8. ISN reset for F-series HP8 gearbox
9. FEM/BDC keyprog module
10. ISN MSx8x (SIEMENS) for BMW
11. F-Coding module
12. Tricore module for BMW
13. CAS4 CAS4+ F-series keyprog module with F-ISN
v2018-12-bmw-e-f-scanner-software-1

v2018-12-bmw-e-f-scanner-software-2

Select the computer, and then right-click, select Manger
Open  Device Manager
Quickly we click two times on USB Serial Port
v2018-12-bmw-e-f-scanner-driver-1
We choose the bookmark Driver and we press on Update Driver
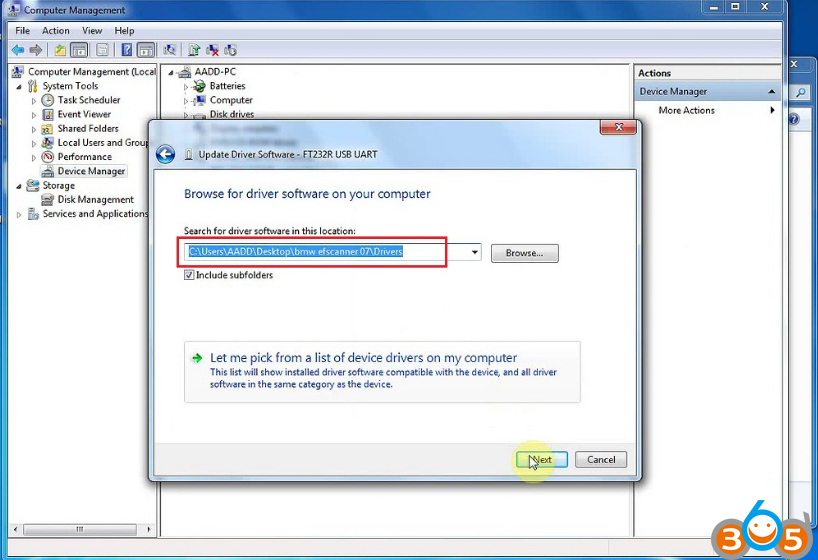
Further we choose Browse my computer for driver software and we press the Browse button
v2018-12-bmw-e-f-scanner-driver-2
Further we Choose a directory where there are drivers for the adapter (by default C:\Program Files (x86)\BMW_Explorer\Drivers\FTD2XX)
v2018-12-bmw-e-f-scanner-driver-3

v2018-12-bmw-e-f-scanner-driver-4
After the choice of drivers we press Next
v2018-12-bmw-e-f-scanner-driver-5
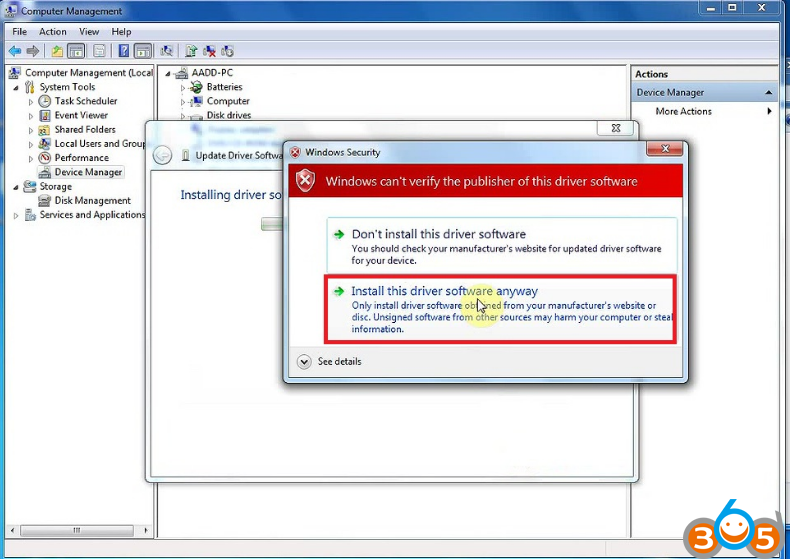
We wait for the end of installation of the driver and we press Close
v2018-12-bmw-e-f-scanner-driver-6
After successful installation we will see the Adapter (USB Serial Port COMXX) in Device Manager
Done.

How to DIY Update BMW F10 2019-1 Navigation

Here's the BMW F10 2019-1 Navigation Update DIY guide provided by a BMW F10 owner.


Just sharing for education purpose. Credit to SWFLf10. You are at your risk.


Software: BMW ENET cable & E-sys coding software for F-series

I'm sure you can find where to download all the software needed and how to install it properly on your PC.

Operating system: Windows 10 running in BootCamp on a MacBook Air.


The basics for install can be found in multiple places online and include the following:

1. Download latest map data for your specific nav unit (Mine is a Next NBT)
2. Extract files to a blank USB drive that is formatted as FAT32
3. Insert USB stick into car, and wait for prompt to update from USB
4. Enter FSC code


For those of you that don't know, the FSC code is specific to the map update and your cars VIN. This code can be bought online, or if you don't mind spending some extra time using Esys and some other software that can be found online, can be generated for free.


I used BMW Esys, BMW-FSC-NBT, and Base64 (Which came with my download of BMW-FSC-NBT). Here is my version of the steps necessary to create the first half of what you need using Esys:

1. Connect to car with Esys.
2. Click “FSC Extended” on left of Esys.
3. Enter “0x63” for the “Diagnostic Address”.
4. Click “Identify”.
5. Wait for “Base Variant” to display your cars' info.
6. Enter “0xDE” for “Application ID”.
7. Enter “0x1” for “Upgrade Index”.
8. Scroll down and select “StoreFSC”.
9. Select the “ >> ” button.
10. Click “Read”.
11. Click “Save” and save as last 7 digits of VIN.FSC
(example: XXXXXXX.FSC)

So that's the part that Esys takes care of. After this, I used a program called Base64, which came with the BMW-FSC-NBT software download I used in the next section. This step requires you to open a command prompt in Windows.

1. Make sure you have the BMW-FSC-NBT software installed and know the location.
2. Move the file you just saved with Esys to the "tools" folder inside the BMW-FSC-NBT software folder.
3. Open a command prompt Windows by typing "cmd" into the start menu on your computer. Now you need to navigate to the “tools” folder you just moved the FSC file to. You need to type "cd" then a space, then the location of the "tools" folder into the command prompt window.
(Example: "cd C:\Users\YourName\Applications\BMW-FSC-NBT\tools")
4. Now in the command prompt window, type in the following using YOUR FSC file name and last 7 digits of VIN (Replace the Xs with your VIN)
“Base64 XXXXXXX.FSC XXXXXXX_000DE001.FSC”
5. Run the BMW-FSC-NBT software by clicking it.
6. Select your newly made FSC file by clicking “Browse” and selecting the new file that you just created in the “tools” folder.
7. Select the correct map from the selection.
8. Click “Generate”. (This will generate your FSC code to enter into iDrive)

The issue I had here is that the map I was trying to update to (North America Next 2019-1) wasn't shown in the list! I had read that I needed to update my lookup.xml file to reflect this map, but didn't quite understand how to do so properly. These are the steps I used to update it to allow me to select it in the BMW-FSC-NBT software:

1. Navigate to the “tools” folder of the BMW-FSC-NBT software.
2. Right click, then select “edit” on the “index.xml” file.
3. Scroll down to the most recent map update for your application. (Mine was showing North America Next 2014-2 as the most recent)
4. Copy the lines from the most recent map update and paste below it.
5. Change “id” to match the map data file name.
6. Change the last two characters of “FscShort” to “FF”.
7. Change “name” to reflect the map data you are updating to.
8. Change “sop” to yesterdays' date.

EXAMPLE for North America Next 2019-1 (Changes I have made are in RED)

</SgbmId>
<SgbmId id="NAVD_000014B8_255_004_177" SWID_FscShort="00A800FF" name="Road Map NORTH AMERICA Next 2019-1" supplier="TAS" sop="11.01.2018" version="10_09" MapOrderNumberBMW="" MapOrderNumberMINI="" MapOrderNumberRR="" successorMapOrderNumberBMW="" successorMapOrderNumberMINI="" successorMapOrderNumberRR="">
<EcuVariant CompatibilityIdentifier="NBT-HB" Format="CIC" />
<SwUpdate SwUpdateEntry=""/>
</SgbmId>

Once I finally completed the changes, the list showed the "North America Next 2019-1" map. I selected it, then hit "Generate". This produced my FSC code needed to install the update! Finally!

I then plugged my USB drive with my map data on it into the car, selected "Update" in iDrive when prompted, and then entered this newly generated FSC code. It took about 15 minutes, then I had a message of success in iDrive!

Recap of the Steps:

VERY FIRST STEP:
Download and install BMW Esys and BMW-FSC-NBT and make sure you have Base64 within your BMW-FSC-NBT software folder.

Download Map and ready USB Drive:
1. Download latest Maps for your vehicle. Unzip and place on newly formatted FAT32 USB Drive.

Updating the lookup file (If your map isn't on the list in BMW-FSC-NBT):
1. Navigate to the “tools” folder of the BMW-FSC-NBT software
2. Right click, then select “edit” on the “index.xml” file
3. Scroll down to the most recent map update for your application
4. Copy the lines from the most recent map update and paste below
5. Change “id” to match the map data file name
6. Change the last two characters of “FscShort” to “FF”
7. Change “name” to reflect the map data you are updating to
8. Change “sop” to yesterday

EXAMPLE for North America Next 2019-1 (Changes in RED)

</SgbmId>
<SgbmId id="NAVD_000014B8_255_004_177" SWID_FscShort="00A800FF" name="Road Map NORTH AMERICA Next 2019-1" supplier="TAS" sop="11.01.2018" version="10_09" MapOrderNumberBMW="" MapOrderNumberMINI="" MapOrderNumberRR="" successorMapOrderNumberBMW="" successorMapOrderNumberMINI="" successorMapOrderNumberRR="">
<EcuVariant CompatibilityIdentifier="NBT-HB" Format="CIC" />
<SwUpdate SwUpdateEntry=""/>
</SgbmId>

Generating an FSC code:
1. Connect to car with E-sys
2. Click “FSC Extended” on left of Esys
3. Enter “0x63” for the “Diagnostic Address”
4. Click “Identify”
5. Wait for “Base Variant” to simply the cars’ info
6. Enter “0xDE” for “Application ID”
7. Enter “0x1” for “Upgrade Index”
8. Scroll down and select “StoreFSC”
9. Select the “ >> ” button
10. Click “Read”
11. Click “Save” and save as last 7 digits of VIN.FSC in the “tools” folder of the BMW-FSC-NBT software folder (example: XXXXXXX.FSC)
12. Open command prompt and navigate to the “tools” folder you just saved the FSC file in
(Example: "cd C:\Users\YourName\Applications\BMW-FSC-NBT\tools")
13. Type in the following using YOUR last 7 digits of VIN
“Base64 XXXXXXX.FSC XXXXXXX_000DE001.FSC”
14. Run the BMW-FSC-NBT software
15. Select your newly made FSC file by clicking “Browse” and selecting the new file in the “tools” folder
16. Select the map from the selection
17. Click “Generate” (This will generate your FSC code to enter into iDrive shortly)
18. Plug in the USB stick with the maps data into the car, wait for the update prompt, then select update
19. Enter the FSC code you generated when iDrive prompts you


Hope it helps.
Src: https://f10.5post.com/forums/showthread.php?t=1556104


1.15.2019

BMW E/F Scanner Program CAS3+ All Keys Lost

Here’s the guide to write keys in CAS3+ in case of loss all working keys using BMW E/F scanner and BMW Explorer software.
bmw-e-f-scanner
ALL keys lost programming procedure
Since ver. 15.02.15 of BMW Explorer user can choose between 3 variants to program ignition key. The lastest version of BMW E/F scanner goes to V2018.12.
(Click to enlarge all images)
1. Variant
NOTE: Please ensure that key slot is unblocked before to program the new key there. 

If you have all keys lost, you must answer NO when BMW-Explorer ask if you have working key. BMW-Explorer will then extract crypto from DDE/DME and EGS GS19D (if available). Your PC must be connected to Internet to fulfill this procedure.
Also it will read ISN from the CAS module and automatically fill the CRYPTO fields in the working window of BMW Explorer.

If all the fields are match each other it means that crypto is correct and you can use any field. For example we can choose EGS crypto, then upload *.bek file, press write (red button) and just follow on-screen instructions. Then start a car.

If your car has DME/DDE with ews3 system and you are going to use EGS crypto, you must answer YES after BMW-Explorer asks you about “CFG”. Then simply wait the finish of the programming procedure. Don’t forget to make DME-CAS sync in DME menu (this step is not available for DME/CAS with ews4 )
In case if you see a different values in the DME crypto and EGS crypto fields, you can try to program the key using each field in turn. 

After the key successfully programmed you must check a key status field
002B00- for pcf7936 chip
004B00- for smart key
005B00- for keyless-go key

Note: When you are using this way of key programming, make sure than DME/DDE-CAS-EGS belongs to the SAME car
bmw-e-f-scanner-cas3-all-keys-lost-1

2 Variant

Please ensure that key slot is unblocked before to program the new key there. 

This variant is usable for a cars equipped with Bosch and Siemens DME/DDE with ews4 16 bytes long ISN code AND you have a possibility to read out ISN from DME/DDE.
BMW-Explorer can read ISN (SecretKey) from the following DME/DDE types-ME17N45 , MEV17_2 , MED17_2 , MV1722 , MVD1722 , MEV17N46 , MEVD176k , D7xN47xx , D7xN57xx , MSS60
If you got above listed DME/DDE, but BMW-Explorer was unable program key automatically, you must go to DME/DDE (Extra functions), read ISN manually and copy it. After that you must return to the CAS, select Key learning, answer NO when BMW-Explorer ask if you have working key, tick DME ISN box and Paste copied ISN into this field, then upload *.bek file, press write (red button) and just follow on-screen instructions. Then start a car.

After the key successfully programmed you must check a key status field
002B00- for pcf7936 chip
004B00- for smart key
005B00- for keyless-go key
bmw-e-f-scanner-cas3-all-keys-lost-2

3 Variant
Please ensure that key slot is unblocked before to program the new key there. 

You can TRY to program key by the following way:

1. Read CAS eeprom using any of suitable programmer (Xprog,ETL etc.)
Note: For the CAS modules programmed with ISTA36-42 (bmw numbers 9221719 , 9226238 , 9221720 , 9227053 , 9226238 , 9217853 , 9226239 , 9217854 , 9227053 , 9226239 , 9227106 , 9217854 , 9230590 , 9227053, 9230591 , 9226238 , 9237046 , 9221720 , 9237047 , 9221719 , 9237046 , 9237047), open read eeprom in the HEX Editor and write down values from the 02 and 03 columns in the 1 and 2 rows (as pictured)
bmw-e-f-scanner-cas3-all-keys-lost-3

2. Note: For the CAS modules programmed with ISTA43-55 (bmw numbers 9253119 , 9253120 , 9257219 , 9253119 , 9257220 , 9253120 , 9262360 , 9262361 , 9267608 , 9267609 , 9273192 , 9262360 , 9273193 , 9262361 , 9278745 , 9267609 ,
9278746 , 9267608 , 9283153 , 9278746 , 9283154 , 9278745 , 9287534 , 9283153 , 9287535 , 9283154 , 9314256 , 9287534 , 9321069 , 9314256) ), open read eeprom in the HEX Editor and write down values from the 00 and 01 columns in the 1 and 2 rows (as pictured)
bmw-e-f-scanner-cas3-all-keys-lost-4

Install CAS3+ back to the car, go to CAS, Extra functions, Key learning, answer NO when BMW-Explorer ask if you have working key,
wait for key data, tick Selection CFG box, enter upper 2 bytes from HEX Editor into first field, enter the lower 2 bytes from HEX Editor into second field.
bmw-e-f-scanner-cas3-all-keys-lost-5
Then upload *.bek file, press write (red button), after some time BMW Explorer will ask you to insert a key into the key slot. Enter a key and press OK. After some time BMW-Explorer will ask you about “CFG”, press YES and wait the procedure finish. Key programming can take up to 2,5 hours, therefore BATTERY CHARGER MUST BE CONNECTED TO THE CAR!!!
Note: When you are using this way of key programming, make sure than DME/DDE-CAS-EGS belongs to the SAME car

After the key successfully programmed you must check a key status field
002B00- for pcf7936 chip
004B00- for smart key
005B00- for keyless-go key
Completed.
http://www.key-programmer.org/2019/01/16/program-bmw-cas3-all-keys-lost-with-bmw-e-f-scanner/

12.27.2018

BMW ISTA-D and ISIS Software Comparison

This is good information for those who want to know if ISTA-D provides technical diagrams and instructions like ISIS/ICOM.

ISIS is a BMW server platform for dealers. All updates are downloaded to the ISIS.
From there the ISIS updates ISID (diagnostics) tablets and ISSS (programming) if applicable.
The ISID runs an embedded windows xp OS.
Installed on the ISID is a program called ISTA-D (recent versions are codenamed ‘Rheingold’)
ISTA-D you can do all diagnostic functions, battery registrations etc etc. it also has wiring diagrams and guides on changing parts.
Some clever russians keep leaking the ISTA-D installer and it can easily be installed on any windows operating system. I can give you download links. They are around 10gb.
In ISTA-D you have a connection manager or how you wish to connect the computer to the odb port.
The common ones are:
ICOM
EDIABAS
OMITEC USB
ICOM is BMW official cable, its predocessor was an OPPS unit. An ICOM is more than just a cable however, it has its own network adapter, mac address, cpu, cooling etc etc. Originals are expensive but you can get cheap but hq chinese clones for around $350 USD like this: http://www.obdii365.com/wholesale/bmw-icom-next-a-b-c-with-software.html
bmw-icom-next-review-1

bmw-icom-next-wlan-setup-2

bmw-icom-next-wlan-setup-3
  
EDIABAS is a communication protocal which requires you to have BMW Standard Tools installed aswell – which isnt a bad thing! This utilises comport access amongst other connection methods and is configured by an ini file. Most people use this method of connection as its cheap, you can get a K+DCAN cable for under $50 USD now. Just do your research first as there ar bad clones about!
OMITEC is also an original USB interface. These are very rare. K+DCAN cable are copies of the OMITEC cable.
Update: Thinking it can be used on a Mac also… I use a Mac sometimes no problem with a windows VMware XP virtual machine and ISTA-D installed.
As I said there is no better diagnostic software. Its dealer level software and It’s freely available now all over the Internet. Plus it’s very user friendly!
So price is Cable + Windows XP CD key for the virtual machine…
Hope that helps.

12.11.2018

How to Reset ELV Counter Warning Light with Ediabas

How to Reset the ELV Counter (Steering Lock) Red Warning Light and your ELV is working, due to a bad battery
So, what is going on? The CAS module has a counter, when this counter exceed the max, a RED warning light come up. When you use a bad battery (low voltage) the ELV works but indicate an error to the CAS module.
Vehicle Tested: R56 Mini

Note: This only works if your ELV works fine and you're having this issue because you didn't replace your battery on time and waited 

To reset the ELV Light, you will need to use the EDIABAS ToolSet 32 software from the BMW Tools Package.

ediabas-reset-bmw-elv-counter-1
On the menu, select File -> "Load SGBD, Group File F3"
ediabas-reset-bmw-elv-counter-2

Look for "Cas.prg" on the file list.

ediabas-reset-bmw-elv-counter-3

Look on the Job list the name: "steuern_elvcounter_cas_loeschen" and "steuern_elvcounter_elv_loeschen". Double click on each one, and wait for a window, it says "Job Done" on the bottom. 

ediabas-reset-bmw-elv-counter-4

DONE!, no more Red Light Steering lock issue. 

12.10.2018

How to use BMW Coding Tool 2.50 to update SP-DATEN Files

The BMW Coding Tool 2.50 allows you to update your SP-DATEN (Data files) automatically instead of manually installing the files by copy and pasting files. It will automatically update the files that require replacing and skip the files that you don’t need!

Related Products:

The BMW Coding Tool is installed when you install your BMW Tools Package. You can find the shortcut on the desktop.
Software Included in BMW Tools Package:
  • INPA 5.06 (Script files in English)
  • EDIABAS 7.3.0
  • NCS Expert 4.0.1 (Menus and Buttons in English)
  • NCS Dummy 0.6.04
  • Tool32 4.03
  • WinKFP 5.3.1
  • BMW Coding Tool v2.5.0 (alternative to NCS Dummy or  for updating DATEN files)
  • Integrated SP-DATEN v53.3 (light version, all you need for coding and diagnostics)
Required Hardware: K + D-CAN “INPA” OBD2 Interface Cable with FTDI FT232RL or FT232RQ Chip
(click to enlarge images)
update-SP-DATEN-Files-1
1. We need to set our default folders for NCSExpert, WinKFP, and EDIABAS. See the screenshots.
Set Default NCS Expert folder
Set Default Ediabas folder
Set defualt WinKFP -NFS folder
Shw default folders
Set custom picture
Reset windows size Sort list items
Show NCS Coding only
update-SP-DATEN-Files-2

update-SP-DATEN-Files-3

update-SP-DATEN-Files-4

update-SP-DATEN-Files-5

update-SP-DATEN-Files-6
2. Once all the folders are set we can now proceed to updating our SPDatens. Doing this by selecting the “Select SP-source” button and then select the folder with the new SPDaten. I always like to start with the earliest model which is E36.
Path should look something like mine in the screenshot.
update-SP-DATEN-Files-7
3. Now that we have set our SPDaten path we can now select the “Update SP-daten” button.
update-SP-DATEN-Files-8
Only all NEWER files will be copied from:
…\SP-DATEN-Exx\ECU –> …\EDIABAS\ECU
…\SP-DATEN-Exx\SGDAT –> …\EC-APPS\NFS\SGDAT
…\SP-DATEN-Exx\SGDAT –> …\NCSEXPER\SGDAT
…\SP-DATEN-Exx\DATEN –> …\NCSEXPER\DATEN\Exx
also update of files in …\NCSEXPER\DATEN
You will notice the files that have been replaced will display update –> **.** and the ones that did not require updating will displayremain –> **.**
In my case as displayed in the image below all will show remain because I have already updated them.
update-SP-DATEN-Files-9
4. Now repeat the same steps for WinKFP…
Select the “Update WinKFP” button and all folders will be copied and replaced from:
…\SP-DATEN-Exx\DATA –> …\EC-APPS\NFS\DATA
also update of SGIDC.AS2 in …\EC-APPS\NFS\DATA\GDATEN to adjust the “long lines”
backup’s of all folders are saved as …\name_date_time
update-SP-DATEN-Files-10
5. Once completed, repeat the same steps for all base models so from E36 to E89. Congratulations you now have successfully updated your NCSExpert and WinKFP with your latest SP-DATEN files.

10.30.2018

ISTA+ V4.12 Expert Mode Activation, Single Module Programming

Does anyone have a solution for Ista+ Programming Expert Mode?
No expert mode available yet for ISTA+ v4.11.12.

This will be an issue in feature, expert mode can get you out of unpleasant work.
For example if you update i update a whole g11 with ista p and if you update kafas you lose fsc codes, so if i deselected kafas, fsc stayed unharmed. But you can do that now with ista+
One more important remark is that esys wont let you update a module that is allready updated, but ista let you do it, so after 7/11 psdzdate you are stuck with this issue too…

Best to use a router for programming HUH etc through ista
Or you can just use tftpd32 (or tftpd64 if 64bit OS)

Update: ISTA+ 4.12.12 has the expert mode – Confirmed!
ista-p-expert-mode-1

ista-p-expert-mode-2

ista-p-expert-mode-3

ista-p-expert-mode-4

ista-p-expert-mode-5
Note that Ista+ expert mode is Ista P expert mode
ista-p-v-4-12
The difference between Expert mode and Ista plus?

The difference is his loader allows for hiding of modules
Ista plus does not he or someone may be working on an alternate loader to hide retrofitted modules but as it so far look into ESYS for that only option I can think of right now last istap that had a lot a F ,G or I cars was 3.64.2 as 3.65.0 only had like 2 model forget exactly which ones you have to double or make link dos command to point to istaplus PSdZ folder

Some new solutions to activate ISTA-P expert mode ?

so updating the folders in ISTA-P with the files from PSdz swe will not do the trick. You will be inserting back all the missing vehicles. I saw in the main series you will have to rename F, G, I series files to reflect.

after copy PSDz (data_swi) to pszdata ISTA P with correction data in mainseries, add data F001, F10,…etc = same result
ISTA P shows window that car is not programmable (only ISTA+)
trick is somewhere else

this is Ista p expert mode confirmed to work 100%


Why not just use a earlier version of ISTA-P (such as 4.08 or 4.10) to do single module coding?
Because what i am getting is there are problematic files out there that BMW knows about and in the latest version of ISTA+ it can stop from a certain update and keep the module on the one that works. So could you not reverse populate for example take the p-files from a later version to a previous but you would need all files and folders for example. anyone with more can chime in


Anyone has good success with Ista P expert mode?
Yep. Have tested Expert Mode on BMW e66
Here is the details…
Select Create new session. Click on Select ISTA/P server automatically. Click on Continue.
ista-p-expert-mode-bmw-e66-1
Click on ICOM Next/ICOM A2 emulator & Connect to continue.
ista-p-expert-mode-bmw-e66-2
Connecting…
Click on on the 4th button at the top, to get the information of Connection manager, then close that interface.
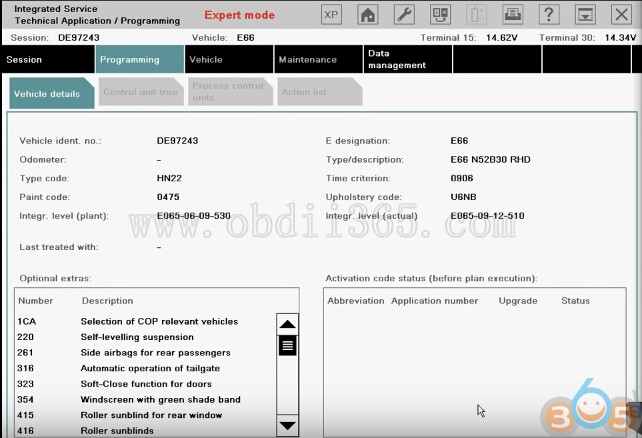
Determining model series…(E66)
Data being checked…
Checking vehicle identification number…(DE97243)
Control unit replaced?
Click on No, and also click on “Before starting vehicle programming…” click on Next.
ista-p-expert-mode-bmw-e66-3
Control unit change over.
ista-p-expert-mode-bmw-e66-4
Determining…
Identifying fitted control units…
Determining target context…
Calculating measure plan…

Go to Control unit tree, and select ZGM.
ista-p-expert-mode-bmw-e66-5
Edit plan show as follows:
ista-p-expert-mode-bmw-e66-6
Go to Immediate measures.
Click on Hide all actions.
ista-p-expert-mode-bmw-e66-7
Go to Edit plan. No cross on Program P. Then close it.
ista-p-expert-mode-bmw-e66-8
Select SZL.
ista-p-expert-mode-bmw-e66-9
Edit plan show as follows:
ista-p-expert-mode-bmw-e66-10
Go to Immediate measures.
Click on Hide all actions.
Back to Edit plan. No cross there. Then close it.
ista-p-expert-mode-bmw-e66-11

Done!