This is a great write-up of INPA BMW software and hardware (K+DCAN interface), incl.:
Part 1: INPA software
– inpa bmw definition
– inpa 5.0.2 & 5.0.6 download
– inpa software install (windows XP/7/8/10)
– inpa driver software installation
– inpa bmw how to use
Part 2: INPA cable
– inpa k+dcan cable website
– k+dcan cable advantage & disadvantage
– k+dcan cable how to use
Part 3: INPA vehicle & protocols
– inpa vehicle coverage
– protocols support
Part 4: INPA errors and solutions
1.Driver Error
2.EDIABAS Error 126 (only up to Ediabas V6.4.x)
3.ToolSet Error: Runtime error ’372’
4.INPA: vehicle could not be identified
5.INPA Error IFH-0009: NO RESPONSE FROM CONTROL UNIT
6. BMW INPA Edibas IFH-0018: INITIALIZATION ERROR
in detail…
– inpa bmw definition
INPA is used for BMW diagnostic & coding software, working with INPA/Ediabas K+DCAN USB interface for E-Chassis vehicles from 1998 to 2008.
– inpa software download
inpa 5.0.2 download:
inpa 5.0.6 download:
Software Version: 5.0.2 and 5.0.6
Operating System: Windows 7/10/XP
Language: English
Update: Can NOT update
Car: BMW E-Chassis vehicles from 1998 to 2008
– inpa software Windows 7 install
VERY IMPORTANT:
1.Close anti-virus software
- INPA BMW software must extract to the local desk (System C), or it would be reported to the error
- Never update the software
Main steps to install inpa:
Step 1: Install INPA software
Step 2: Connect Inpa cable with the laptop
Step 3: Install INPA software driver
inpa installation instruction in detail:
Free Download Inpa BMW Software from the CD off
obdii365.com
(it’s good to get the free software on the web, but do confirm it’s security and functionality before download. if not, obdii365 is your way to go. inpa software is tested successfully by thousands of and millions of professionals)
Extract “BMW Inpa” to desktop, then Double-click on “Inpa V5.02″, and extract ” cicdaten” “ediabas_7.2.0.504_” “NCSEXPER” these three compressed packages at the same time to “local desk C (System C)”
Click on “Extact to”, then choose “System C” , after that, click on “OK”.
Click on “Yes to All”.
Open “My computer” then find Bin folder, and choose and right click on ” INPALOAD”, then send it to Desktop (create shortcut).
Choose My computer, right click on and choose “Properties”.
Choose and click on “Advance system settings” to open System Properties
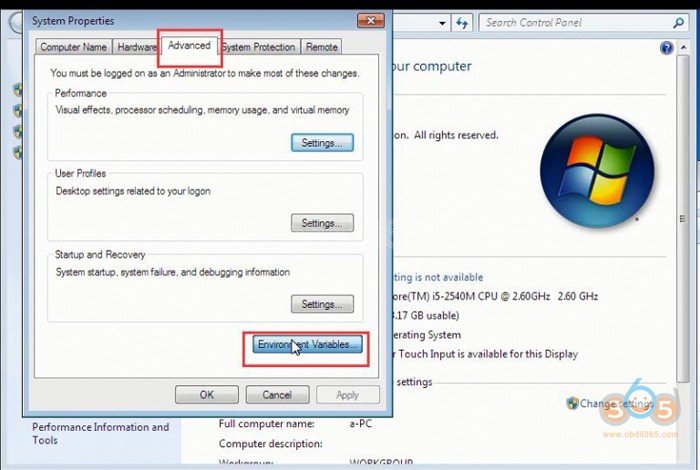
Choose “Advanced” , then click on “Environment Variables” button
Choose “path” then click on “New” button
Enter the “path” to Variable name, and enter the Bin location to Variable Value.
Click on the “OK” button.
Double-click on “INPALOAD_Shortcut” button to open INPA program.
INPA BMW software installation success!
Tips: for more tips of inpa install, pls click on operation system below to get the installation instruction
– inpa driver software installation
k+dcan interface is connected to the laptop thru the USB port
Choose My computer, then right click on “Manage” button after connect with INPA BMW cable.
Choose and click on “Device Manager” button, then choose and right click on “USB Serial Port(COM6) Properties” button, and click on “Properties” button.
Choose and click on “Port Settings” button then click on “Advanced” button.
For ” COM Port Number” choose “COM1”, for “Latency Timer(msec)” choose “1”, then click on “OK” button.
inpa driver sw is installed!
– INPA BMW how to use
Start Inpa using Inpaload.exe in C:\Inpa\Bin or alternatively C:\EC-Apps\Inpa\Bin or use Start All Programs EDIABAS INPA ELDI NCS NFS INPA(_.IPO) to start the general reworking programme. This corresponds to calling Inpaload.exe under smuc0900\sg\Inpa\Bin or alternatively C:\Inpa\Bin.
How do I find out what EDIABAS package is installed?
The version of the currently installed Ediabas package can be seen in the files C:\EDIABAS\version.txt or C:\EDIABAS\package.pdf.
How can I uninstall EDIABAS or INPA?
You uninstall INPA by deleting the Ediabas and Inpa folders under C:\. Reason: No registry entries are made during the installation.
What is the difference between \EDIABAS\bin\ToolSet.exe and\EDIABA\bin\Tool32.exe?
Tool32.exe is current and when it is started, the Ediabas server will start as a 32-bit application. ToolSet.exe is an old version and is required under Windows 3.11.
What do SGBDs with the name _xxx mean?
SGBDs that begin with “_” (e.g. _LWS5), contain jobs that are only intended for development (e.g.: writing the ident data). These SGBDs are not used in production or in customer service.
What is the KVP Editor?
KVP stands for continuous improvement process. The KVP Editor can be called when using the INPA Tool. This is mainly used in reworking and in the plant. Here, the user has the possibility to enter his name and telephone number and then enter an error description and improvement request and then to send the form directly to the person responsible at BMW.
– inpa k+dcan cable website
k+dcan cable price: 17.99
Good to know: Is K+Dcan cable is the right one you need?
K+Dcan cable and ENET Esys cable and ICOM Next, which one should you have?
It depends on your purpose (diagnostic or coding or programming) and model (Exx or Fxx or others).
For Coding, you need different Tools, NCS Expert / SP-Daten for E-Series and E-Sys / PSdZData for F-Series.
All Diagnosis and Coding can be done with cheap DCAN Cable for E-Series and cheap ENET Cable for F-Series.
For Programming (Flashing ECU’s with new Firmware), then you need ISTA/P for for both E-Series and F-Series cars, or you can use WinKFP for E-Series and E-Sys for F-Series. For E-Series Programming, you will need an ICOM, but for F-Series Programming, you can use ENET Cable.
– k+dcan cable advantage & disadvantage
Connection by soldering is a bad option as it limits the usefulness of the interface, I have an adapter but consider a switch to be a better option
With these K+DCAN cables there are two subtle different versions, one with pin 8 enabled, one with it disabled. The one with it disabled is ideal for e90 newer than 03/07 & that era, these leads often come with a black adapter to re-enable the pin 8 (by just tying it to pin 9) so it will also be suitable for e46/e39/e63 etc. The ones with pin 8 active are just older versions of the cable. Worst cast scenario you just need to modify the cable & stuck a switch on it to toggle pin 8 on/off as needed.
The reasons being that on DCAN cars one pin is used for a ethernet connection and the other to the K data line – on K line cars, both pins are connected to K data lines and that creating a switch mode circuit would cost more than the interface is worth. The 2 most sensible options are both hardware-related:-
– Use an adapter (such as the one sold by One Stop electronics) which internally bridges pins 7 & 8 or…
– Mount a small switch on the OBD plug end of your adapter, which can bridge (for K line) or separate (for DCAN) the connection between pins 7 & 8.
As soon as you connect the interface to the car and your computer, run DCAN.exe to configure the comms rate. I have only used the K+DCAN interface with DCAN cars.
Fyi, You only need to run DCAN.exe when you are switching between modes. If you run it the first time you connect to a DCAN car, your computer will retain the settings.
Switch K+D CAN adapter between K and D CAN protocols for use, depends on the car that is connected.
The last, K+DCAN cable you see the PCB
Very fine work, bridged soldering of 2 pins is intentional.
– k+dcan inpa cable how to use
A lot of questions and answers here will help use/switch/connect to K-Line or Dcan pin 7&8?
Q: So you have to physically connect (K-Line) or disconnect (DCAN) pin 7&8?
A: Yes, I think connection by soldering is a bad option as it limits the usefulness of the interface, I have an adapter but consider a switch to be a better option.
Q: Is there anything else to do for switching from K-Line to DCAN then disconnecting pin 7&8? Unfortunately I don’t have a DCAN model available.
A: As soon as you connect the interface to the car and your computer, run DCAN.exe to configure the comms rate. I have only used my K+DCAN interface with DCAN cars.
Q: Is it necessary to do so every time I want to use DCAN or is the interface staying in DCAN mode once I ran DCAN.exe?
A: You only need to run it when you are switching between modes. If you run it the first time you connect to a DCAN car, your computer will retain the settings.
Q: How do I switch back to K-Line? Just by connecting the two pins or is further action on the computer required?
A: Earlier e39 had both the OBD port in the cabin and the round 20 pin connector under the hood.
The OBD port only allowed access to limited modules, I think only the DME in fact.
I always switch my K+D CAN adapter between K and D CAN protocols as I need to, depending on the car that I’m connecting to.
I use the DOS version of the DCAN utility. As mentioned if you only use the adapter on the e39, run the utility once and set the adapter to K CAN and leave it at that.
In fact thinking about it I use the same adapter for INPA, DIS and ISID.
With these K DCAN cables there are two subtle different versions, one with pin 8 enabled, one with it disabled. The one with it disabled is ideal for e90 newer than 03/07 & that era, these leads often come with a black adapter to re-enable the pin 8 (by just tying it to pin 9) so it will also be suitable for e46/e39/e63 etc. The ones with pin 8 active are just older versions of the cable. Worst cast scenario you just need to modify the cable & stuck a switch on it to toggle pin 8 on/off as needed.
Finally there are a lot of rubbish adapter cables out there. Finding a good one can be tricky.
Q: I have a 2003 E39 so there is no OBD1 anymore. How do you switch the modes physically? Do you use such a adapter to connect Pin 7&8?
A: If you don‘t plan to use the cable on any cars that have DCAN(2007+) then you can pop open the case and solder a jumper between them. When you do this the DCAN functionality will no longer work though.
Part 3: INPA vehicle &protocol
– INPA vehicle coverage
For BMW 1-Series : E81, E82, E83, E87, E88 (2004-2011)
For BMW 3-Series: E90, E91, E92, E93 (2006-2011)
For BMW 5-Series: E60 (2004-2009)
For BMW Z4 : E85, E86 (2002-2008) E89 (2009-present)
For BMW X1: E84
For BMW X5: E70
For BMW X6: E71
– Protocols support
1)Fast magistral D-CAN and PT-CAN (500 kbit/s)
2)Slow magistral K-CAN (100 kbit/s)
3) Standard for BM-W protocol (for BMW OBD interface).
D-CAN for:
1)E60, E61 od 03/2007
2)E83 od 09/2006
3)E81, E87 od 03/2007
4)E90, E91, E92, E93 od 03/2007
5)E70 (new model X5)
6)R56 (new model MINI)
PT-CAN
K-CAN-fully
a switchable speed of magisterial CAN – you can diagnose driver without any car
Protocol “For B-MW OBD interface” for older cars:
1)from 1995 to 1998 (don’t need K-line).
2)from 1998 to 03/2008 (all models)
Part 4: INPA BMW software troubleshooting
1.Driver Error
Message comes along with an ADS or OBD connector.
This error occurs if another program or device has taken the COM1 port of your PC.
If you want to work with EDIABAS or INPA, please make sure that the COM1 port is not taken.
2.EDIABAS Error 126 (only up to Ediabas V6.4.x)
Reason: This error message appears if you start the Tool Set while an INPA script is running. This is also true the other way round. The reason for this is that only one programme can access EDIABAS at a time.
Solution: Therefore, before you start the ToolSet, you must exit INPA!!!
3.ToolSet Error: Runtime error ’372’
The following error message appears.
Reason: The old version msflxgrd.ocx exists under c:\winnt\system32.
Solution: msflxgrd.ocx under c:\Ediabas\bin must be registered. To do this, select “Start” “Run…” and execute regsvr32: \ediabas\bin\msflxgrd.ocx in the window and confirm with “OK“. The following must be entered for Windows XP: “regsvr32 c:\ediabas\bin\ msflxgrd.ocx“
- INPA: vehicle could not be identified
Solution:
– uninstall supplemental Ediabas altogether (right click/uninstall on Ediabas MSI file if it’s the one that’s currently installed)
– in your main ISTA/D deployment directory, rename C:\Rheingold\Ediabas\BIN to C:\Rheingold\Ediabas\OLD_BIN
– reinstall Ediabas MSI package, changing its install path to C:\Rheingold\Ediabas\ during installation
– this will create a new C:\Rheingold\Ediabas\BIN directory containing all Ediabas binaries + DLLs + INI files
– the rest of Ediabas package (docs, helper files, sim files, etc ….) will be installed in C:\EDIABAS as usual
– modify EcuPath parameter inside C:\Rheingold\Ediabas\BIN\EDIABAS.INI to C:\Rheingold\Ecu
Then, you can redo your other settings :
– C:\Rheingold\Ediabas\BIN\EDIABAS.INI
Interface = STD:OBD
You don’t care about anything TCP or Ethernet here as you’ll be using an USB K+DCAN cable if I’m correct (=> nothing to do with a network connection).
– C:\Rheingold\Ediabas\BIN\OBD.INI
[OBD]
Port=Com9
Hardware=OBD
You also don’t have to care about ifhsrv32, which is a network proxy for Ediabas. It’s used when ISTA (or any BMW diag software needing Ediabas to connect to car), is run from another PC than the one where Ediabas itself is installed, and “discusses” remotely with it over a network.
Guess it’s not the classic case for DIYers
- INPA Error IFH-0009: NO RESPONSE FROM CONTROL UNIT
The hardware for INPA can be:
INPA KDCAN USB cable;
EDIABAS OBDII interface;
Reason:
1) Poor quality, or incorrectly wired interfaces. IFH-0009 errors are the most common in D-Can+K usb interface leads. Often these low-quality can be badly constructed, incorrectly wired, or contain the wrong chip set drivers or come with no drivers at all!. Whilst not all Chinese interfaces are poor quality, buying cheap imported leads is a gamble and when problems occur the seller probably won’t be interested. It is therefore important that you buy an interface lead from a good quality, reputable Vendor.
2) Wrong or Incorrect Interface Drivers. Again, mass produced interfaces can often contain cd’s with the wrong chipset drivers or come with no CD at all. Without the correct (latest) USB drivers, your interface lead will not install under windows properly. Our software package comes complete with a popular driver which is compatible with most Chinese and Western produced USB Interfaces, which will often work if the one supplied from your interface lead vendor doesn’t or hasn’t been included.
3) Incorrectly configured interface lead. Again, one of the most common problems with USB type leads. When installing a D-Can or Usb Interface lead, you will need to reconfigure the Windows based com port settings, so that the USB lead, appears to replicate an old RS-232 serial port. To replicate the port correctly, you need to change the existing Com port setting of the USB interface within Windows to Com Port 1 and change the latency setting to ‘1′ and check any ‘Fifo’ box
4) Incorrectly wired interface. Once again, there is no set standard as to the wiring pin configurations used within D-Can + K interfaces, by the various manufacturers. Some interface leads have pin 8 disconnected, some have pin 8 physically linked (bridged) to Pin 7, and some have pin 7 & 8 connected individually with no bridge link. If you still have problems connecting to the vehicle, and still get ‘IFH’ style errors then you should open the OBD Socket of the lead and check the pin wiring to see which type of interface you have. You should consider trying your interface lead, with the following configurations….
i) Pin 8 joined to Pin 7 using a small wire link
ii) Pin 8 physically disconnected
iii) Pin 7 and Pin 8 individually connected to their own pins with no link.
More often than not, one of these configurations will work with your vehicle, I recommend trying it with pins 7 & 8 linked together first, as this is by far the most popular vehicle configuration.
Also don’t assume that once you have found the pin 8 solution which works with one vehicle, that it will automatically work with a different model. If you have more than one D-Can equipped vehicle, you may need to obtain a second interface lead and configure ‘pin 8′ differently.
If you don’t own a soldering iron, or if you don’t feel confident about soldering electrical connectors, then there are adaptors available which will bridge pins 7 & 8 together, without any need to open the OBD socket or solder.
5) Incomplete Versions of INPA. There are many versions of Inpa around, many of which are incomplete or simply lack the various configuration files in which to work correctly. If you try all of the above and the IFH-0009 problem still remains, then you will need to consider buying and installing the full version of Inpa which includes Ediabas and BMW Standard Tools
Solution:
Real case solved by one of solutions above:
Background:
- I have a 2004 325ci2. I purchased the k+dcan cable. It is an under-the-dash OBD to USB cable.3. It came with what was described as INPA 5.02 and EDIABAS 6.4.7. You have to install BMW Tools first, and then update. (Updating INPA, it shows a check mark next to INPA 5.01 “update,” and loading INPA, it says version 5.00 at the top bar.) I also installed NCSExpert.4. I am using windows XP SP3 32 bit. Firewall disabled, no anti-virus. No other software is installed. (I’ve had the same problem using Win 7 and Vista).
5. C:\Ediabas\bin is in the path.
6. Installed the USB cable and set the COM port to 1. Latency is set to 1ms. There is no option to use FIFO buffer.
7. Ediabas.ini has STD:OBD as interface. It is also set so loadwinxp = 1
8. OBD.INI is in C:\ediabas\bin and \system32. COM port is set to 1 and hardware = USB (when hardware = OBD the battery circle is black even when not plugged into the car).
9. When loading INPA, I get black battery and ignition when plugged in and starting car.
10. I can successfully read the ECU. I can read and clear errors.
11. When trying to read any other module, I get the IFH 0009 No Response From Control Unit.
How to solved:
I took about the connector and pins 7 and 8 are indeed soldered together!
I verified that both pins 7 and 8 had voltage and that the connection from the chassis wires to the obd plug under the dash were solid.
I then looked closely at pin #8 on the OBD/USB wire and noticed that it was bent slightly. It was not lining up in the pin #8 slot! I straightened it out and it worked!
- BMW INPA Edibas IFH-0018: INITIALIZATION ERROR
Keep updating…