10.28.2022

BMW ICOM Next 'Firmware' Status Cannot be Selected Solution

 Problem:

I got a problem with the bmw icom next (item#SP269-D). It is in "Firmware" status and cannot be selected. Any solution?

BMW ICOM Next 'Firmware' Status 1

BMW ICOM Next 'Firmware' Status 2

BMW ICOM Next 'Firmware' Status 3

BMW ICOM Next 'Firmware' Status 4
Solution:
BMW ICOM next sp269-d use VXDIAG solution. Download and install VX Manager driver. Then update firmware in vx manager.

6.29.2022

How to Change 2022.06 BMW ICOM ISTA-D Language?

 06/2022 BMW ICOM ISTA-D 4.35.20 and ISTA-P 3.70.0.200 are multi-language enabled.  2022.06 ista-d language change is different from older versions. If failed to change the language, follow the guide below to fix it.


Software is in Win10 x64bit HDD/SSD format.  It is compatible with BMW ICOM NextVXDIAG VCX SE BMW and Godiag V600 scanners.


How to Change ISTA-D language?

ISTA-D Language: Czech, Dutch, French, German, Greek, Italian, Japanese, Korean, Polish, Portuguese, Russian, Spanish, Sweden, Thai, Turkish


Open Language Install folder on the desktop

Open delete all language pack.cmd

change bmw icom ista-d language 1

Extract the language pack you desired i.e French. Extract install-French.rar to C:/EC-APPS/ISTA/SQLiteDBs

change bmw icom ista-d language 2

Merge BMW Language Fix program on desktop

change bmw icom ista-d language 3

change bmw icom ista-d language 4

change bmw icom ista-d language 5

Open BMWGroup ISTA program on the desktop

change bmw icom ista-d language 6

Select Tool tab- Client settings

Select the corresponding language.

change bmw icom ista-d language 7

The language has been changed to French.

Exit ISTA-D and run again.


Video reference:

How to Change ICOM Next ISTA-P Language?

ISTA-P language change is as usual.

ISTA-P Language:  English, Chinese, Czech, Dutch, French, German, Greek, Indonesian, Italian, Japanese, Korean, Polish,
Portuguese, Russian, Spanish, Swedish, Thai, Turkish


Open BMWGroup ISTA-P on desktop

Click i icon and Reset Settings

change bmw icom ista-p language 1

Select Automatic search

change bmw icom ista-p language 2

Select language you desired

change bmw icom ista-p language 3

MUST tick Expert Mode and save setting

change bmw icom ista-p language 4

Run ISTA-P software.

change bmw icom ista-p language 5

6.14.2022

Recode used Airbag modules with correct Vin number

Step by Step to edit VIN, Flash, Code to Default, Clear Errors and Start System Time of the Airbag Gateway Module.


INPA: UIF (User Information Field) Report
1-Open INPA>select your car model >Functional Jobs>F3 UIF
-This is the first change. The E85 profile says "Quasi Functional" and doesn't have the F3 UIF choice on my version, so I did an Information report instead (F2)

2-You'll see a list of all control units with their ZUSB number and VIN
-This is the BMW part number that comes up for the module you are sorting out in the information report. I couldn't see the VIN anywhere on this report so I just wrote it down from the windscreen.

3-Print to PDF the report.
4-Identify the ZUSB numbers without your VIN and copy from the PDF and close INPA
- I didn't do these steps, I just copied down the part number of the modules I needed (in my case "Airbag ECU or Safety Info Module" and "Satellite B Pillar Left").

WinKFP: Edit VIN and Flash Module
5-Open WinKFP (Load SPDaten files google it)
- This video is the one I followed, just skip the first couple of minutes until you get to the WinKFP (I didn't have that first program) https://www.youtube.com/watch?v=-KeM3Bw8nD4
6-Select comfort mode
7-Then click find ZUSB
8-Paste the number you copied
9-this will go straight to the right ZUSB
-In my case this only worked for one of the two modules. The other one had a ZUSB/part number older than the daten files I was using, so was not recognised when I typed it in. There is another way to do this next bit if you find the same thing (see alternative below). If this step does work correctly, note down the ECU Family the module is in (from the left column), you will need it to start the system time later on.

10-Then enter your full VIN and then click on done
11-Double check that the module your going to flash it's safe to flash with your cable and the battery needs to be connect to another power source
12-Click on update ZUSB (this will flash the module with SPDaten files and re-write the VIN)

Alternative:
A1. You need to find the ECU family that your module is in. For me the main airbag ECU was in SIM85 and the pillar module was in SBL264. To double check this, look for your *.his files on the PC (mine were in C:\EC-APPS\NFS\DATA). They are all named with the ECU family (SIM85.his for example), so if you open these up with notepad and search through you will see all the historic ZUSB/part numbers for that module. When you find the one with your module part number in you will have the ECU family name you are looking for.
A2. Open WinFKP
A3. Select Comfort mode
A4. Select Update ZUSB
A5. Select the correct family for your module
A6. Enter your full VIN and then click done
A7. Double check that the module your going to flash it's safe to flash with your cable and the battery needs to be connect to another power source
A8. Click on Prog. ZB-Update
A9. This will then show you the update that is about to be programmed onto the module, click ok to start programming. This took a few minutes per module in my case, so make sure your car battery and laptop aren't going to run out of juice halfway through. I hooked the car up to a charger just in case.

NCExpert: Code to Default
-If you're interested in what you are doing here then I found a really useful introductory guide. It was good to understand a little bit of what I was actually doing, although you don't need it to complete the next steps: https://www.bimmerforums.com/forum/show ... NCS-Expert

13- Open NCExpert
14-Load profile -> Expertmode (I used Expertenmodus (Werkseinstellung), as Expertmode wouldn't load on my version as it was too old) -> F1 -> F3 -> choose (E85) from the list -> choose any module you want from this list -> now click F6 Back -> select F4 Process ECU -> choose Module -> now click ReadECU -> close the notepad window that showed up after the module was read (On mine it came up with another window with three text boxes in, I just closed this).
15-Press F5 for basic functions -> Select "coapiReadSgGetFswPsw" and click Ok -> Select F2 "job" select SG_CODIEREN and press ok -> Press F3 Execute job and wait for the buttons to become active, when active it's all done.

INPA: Identification Report and Clear Errors
16-Open INPA>select your car model >Functional Jobs>Identification
17-Print the report to PDF.
18-Look in the SGBD column the module you replace
19-Clear (EM, IM and HM) Errors and Close INPA
- I couldn't see the SGBD column on the E85 information report. i just noted it down from earlier when using WinKFP.

Ediabas Tool32: Start System Time
20-Start Tool32
21-Select File->Load SGBD, Group file
22-Browse to the EDIABAS\ECU folder, and search for the file name based on the listed SGBD column. Can be more than 1 file.
-I actually couldn't find an exact match for the satellite pillar that had come up in WinKFP, but I chose SBSL85 and it seemed to work. The main ECU was SIM85 again so this was more obvious.

23-In the Left of the window select systemzeit_lesen (write)
24-In the middle of the window Argument (value of) type 1 in the dropdown menu
25-double click systemzeit_lesen and done.
26-double click systemzeit_starten. (no arguments)

I had to go back into INPA and clear the errors on the safety modules again to finish everything off.

I unplugged the cables, switched the car on properly, and celebrated loudly when the airbag light went off. I also breathed a big sigh of relief as I had approached this with some trepidation to start with, but in the end it wasn't too hard with all the information that others have kindly made available already.

6.13.2022

Free Download BMW ISTA+ 4.35.2x Torrent

 Here comes the free BMW ISTA+ ISTA-D Rheingold 4.35.2Ñ… – torrent.

https://mega.nz/file/zn5DwKoZ#TzmrYjNKnXFAw-KlGvbobIT5k9URZpftiTvJxJZIdps

No pass. Does require a license key. We don’t provide that key.

If need an SSD, check 06/2022 ISTA-D 4.35.20 ISTA-P 3.70.0.200

https://www.obdii365.com/wholesale/v202008-bmw-icom-software-ssd.html
Does not require a activation license key.


System requirements

  • Windows 10 v1903 or higher
  • Windows 7, 8 not supported
  • Windows user name should not contain spaces

What was changed

  • Reject fake FSC is disabled
  • Resolution can be changed in the ISTAGUI.exe.config
  • Disable CheckSystemRequirements is now possible in ISTAGUI.exe.config
  • Enable programming with ENET is now possible in ISTAGUI.exe.config
  • “Unknown terminal voltage!” message with ENET was fixed, now ISTA checks really Voltage, but not displays it
  • Read FASTA Data from Vehicle was disabled in ISTAGUI.exe.config

Works with: BMW ICOM, ICOM NextENETINPA, j2534 / PassThru, VXDIAG BMWGodiag BMW

Programs for diagnostics and reprogramming of electronic control units of BMW, MINI, Rolls-Royce cars.

bmw icom 4.35.20 software 1

bmw icom 4.35.20 software 2

bmw icom 4.35.20 software 3

BMW ICOM, ENET, K+DCAN Cable Configuration Manual

5.05.2022

How to Set up BMW ISTA-D with Openport 2.0 ?

1.How to setup BMW ISTA-D working with Openport 2.0?


1). Firstly you should have ISTA-D Programmer installed ,then run BMW Passthru drivers under Administrator
2). Choose Openport 2.0 as J2534 Device
3). Copy all fies EXCEPT EDIABAS.INI from C:\Program files(X86)\BMW AG|PassThruD to C:EDIABAS\BIN ,!!! DO NOT OVERWRITE EXISTING FILES !!!
4). Open the C:\EDIABAS\BIN\EDIABAS.INI file in notepad ,Edit configuration interface = STD:passthrud and Save it.
5). Run the BMW ISTA-D again and select menu Configuration—Interface,Select the EDIABAS.INI(You edited ones) and Apply it

Finished! Now you can test BMW Vehicles with Tactrix OPENPORT Interface through ISTA Programmer .it will not work on all models but newer models should work okay
You can download BMW ISTA-D Programmer Free from some garage forum or buy Hard disk from our store.
And here is the link for download BMW Passthru Drivers

11.02.2021

Retrofit BMW M3 Instrument Cluster with R270 Ncs Expert

This is a DIY guide that explains how one can retrofit another instrument cluster into their car. In this case, I was upgrading to an M3 cluster in my 128i, but all coding processes apply to retrofitting other 1'er clusters (135i cluster in a 128i, for example).

Important Notes:

I am using Windows 10 Home 64-bit on a Lenovo Legion gaming laptop. Nothing specialized here, computer-wise. A laptop is preferable since you'll need to do some in-car coding.

The donor instrument cluster MUST have fewer miles than your car in order to use this process.

I bought a cluster from a manual M3, and installed it into a manual 128i. Please do not ask how to install in an automatic, because, I have no idea. I'd assume the process is much the same (it's probably exactly the same, since NCS Expert really does all the footwork for you).

All software below is what I used, and had success with. It's reasonable to assume that it'll work for you, too. If it doesn't, google is a wonderful tool that fixes issues for lots of people (myself included).

You should have a basic understanding of NCS Expert and how it works.

Materials for Coding the New-to-You Cluster:
-R270+ Programmer (like this one)
-SOIC8 Testing Clip (like this one)
-Used Instrument Cluster (This process requires that it has less miles than your car; easy for me, with 196k miles when shopping for M3 parts)
-T10 Torx screwdriver (only necessary for M3 clusters)
-Install R270 Programmer Software (this download is clean, I wouldn't recommend using the disc included with the programmer, RUN SETUP.EXE to install)
-Install HxD hex editor (here)
-Mike's Easy BMW Tools (this is what works for me)
-K-DCAN Cable (this one works for me)

Preparing for Coding:

Make sure all the necessary software has been installed, and that the programs launch correctly. Test the BMW tools by launching INPA and verifying that it's connected.

You'll first need to open-up your new instrument cluster. On the M3 clusters, there are four silver T10 screws on the back that you'll need to loosen before attempting to hulk the thing apart. After those screws are out, work your way around the cluster, popping each of the 6 retainers (2 top, 2 bottom, 1 each side) and slowly pull the two halves apart.

Now, you need to pop the gauge needles off. For this, I recommend cutting out a four-inch square piece of paper, and then cutting a ~2mm-wide slot, about 2 inches long, starting mid-way on one of the sides and going to the center of the square of paper. Now, fit this square of paper underneath the needles, and above the gauge dial. The slot is supposed to let you slide the piece of paper underneath both needles (speedo and fuel, or tach and oil temp) and around their pins so that it protects the dial (they scratch easily). To pop the needles off, I recommend a very thin fork that'll fit around the pins. Just work it under the needles, and gently pry upwards. Shoot for the most vertical motion possible, with as little twisting as possible. If you snap the pins that hold the needles, you pretty much have to scrap that cluster. In a pinch, a thin, flat-blade screwdriver works just fine. Set the needles aside in a safe place after you're done playing with them (we all do it).

This is a tricky one to explain, but here it goes: You now need to flip the cluster over to the black plastic side. You will see a rectangular 18-pin connector (it's the only connector, but I'm trying to be detailed). You need to push downwards on that connector (towards the bottom of the cluster assembly) push it out so that the white plastic part pops out a little, then press the opposite direction on the side that didn't pop out, and kinda wiggle the thing apart. The end result will be a large piece of black plastic, and then the white plastic part with the now exposed backside of the circuit board.

Now, separate the white plastic from the circuitry by releasing four little clips (2 on top, 2 on bottom). For 1-series clusters, you will need to also detach the ribbon cable attached to the LCD panel. Simply disconnect it from the long white connector at the bottom of the circuit board. Now, you can clearly see the brains that make your instrument cluster tick, there's far more going on than you'd think, a far cry from old cars (which makes our jobs super easy).

You are now ready to do the first part of coding.

Clearing Old VIN from EEPROM:

Pull out your R270+ and your SOIC8 test clip. Find your EEPROM. It is an 8-pin chip (four on a side). On the M3 cluster, it is just above the left corner of the LCD display (as shown in the huge picture below). The clip I used (link above), has a pink wire denoting Pin 8. If you look at the text on the EEPROM, correct side up, Pin 8 is on the bottom left of the chip.
Ensure everything is plugged-in and connected. Launch the R270 programmer application, select which chip it is (printed on EEPROM). All three clusters I've seen had 080D0WQ chips, but verify yours because they can be different. Hit "Read" ignore the obnoxious beeps from the programmer box, and save the .BIN file to your desktop (you can save it anywhere, really). Now, close the R270 program, and open HxD. Open the .BIN file. Scroll down to the -2E0 line, and highlight all data in that line, and replace it with FF's. Line -2E0 should read "FF FF FF FF FF FF FF FF FF FF FF FF FF FF FF FF" when done (you could copy that and paste it into HxD, too). Save the .BIN file, close HxD, and open the R270 app again. Load the .BIN file, then verify the selected chip, and hit write. This process will take about a minute, and there will be lots of beeping.
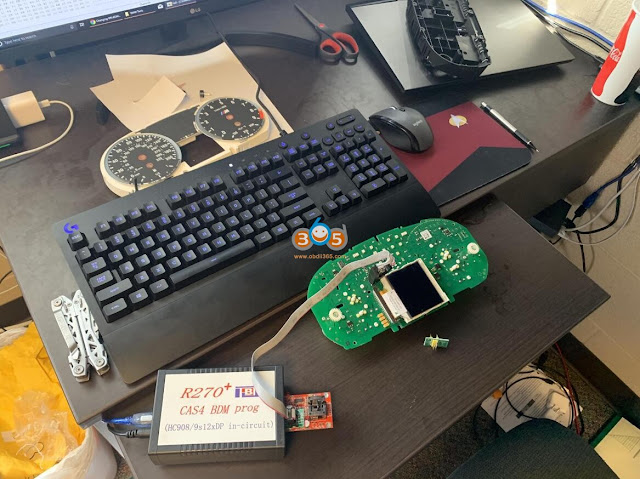
Retrofit BMW M3 Instrument Cluster with R270  1
The programmer comes with just the red board. The clip comes with two adapters, I used the black one with the keyed connector for the clip itself and simply inserted it into the pin holes next to the ZIF socket. (Pic attached)
Retrofit BMW M3 Instrument Cluster with R270  2

Retrofit BMW M3 Instrument Cluster with R270 3
Once finished, you are done with this part of the install. Disconnect the programmer, and, minus the needles and front cover (part with clear plastic), reassemble the cluster. You should ONLY have the back black plastic part, circuit board, and white plastic part put together.

Coding Cluster to Car with NCS Expert:

After you're done being extremely happy that you did a computer thing, go out to your car with your half-cluster and your needles.

I would disconnect the negative battery lead for this part.

Remove your original cluster, there are two torx (T15??) screws at the top of the hood. Remove those, then use a thin flat-blade screwdriver to push the top of the cluster downwards, then pull the cluster out. Undo the connector on the back (there's a latch mechanism, so be aware of that).

Now, connect your new-to-you cluster, and THEN reconnect the battery, if you disconnected it.

Open your computer, turn the ignition on (door closed, engine not running, climate control unit should turn on). Connect your K-DCAN cable and verify communication with INPA. Open NCS Expert, load "Default profile" (Mike's Tools). Hit "VIN/ZCS/FA" then hit "ZCS/FZ f. ECU" and select "E89" for chassis, then "CAS" for module. Give it a second to fill VIN and VO fields. Hit "Back" then hit "Process ECU" select "KOMBI" and hit ok. "Change job" to "SG_CODIEREN" and the "execute job." It will take a couple seconds and there will be beeping and weird noises. Once done, your new cluster is coded to your car's VIN, and will not show any errors for things your car doesn't have.

9.14.2021

How to Solve ICOM Next cannot detect by Itool Radar?

 Problem: I have a BMW ICOM Next. I upgraded firmware for it. Now it cannot be find by itool radar software. I tried restore using USB flash method. However when I reset Icom by press and hold the pin hole near USB port, but does not happen on my Icom Next.

Solve ICOM Next cannot detect by Itool Radar 1

Solve ICOM Next cannot detect by Itool Radar 2

Solve ICOM Next cannot detect by Itool Radar 33

How to restore this Icom Next?

SOLVED by re-injecting via USB key files : “USER.settings” and “user.settings.log”  (can find in “Restore ICOM.7z” in ISTA installation package)
ICOM IP address was lost and now all OK !!!!


Credit to @ nono93


Any problem with BMW ICOM Next software, contact at www.obdii365.com.