2.25.2017

How to retrofit Cruise Control for BMW F30 F20

This BMW Cruise Control retrofit DIY guide is for F20 or F30 with LIM function only mainly non-US car. The DIY will require you to replace multifunction steering wheel switch and VO Code the car.


What does this DIY do?

Replace and code multifunction steering-wheel switch from LIM function to dynamic cruise control capability on BMW F20 or F30. This will allow the car to have dynamic cruise control capability. The set speed can be selected from 30 km/h to 180 km/h: in convenient steps of 10 or fine steps of 1. The set speed is displayed on the instrument panel via speedo dial and briefly on information display.

enable-cruise-control

Dynamic Cruise Control Dynamic cruise control is an electronic cruise control system with an extra braking function. This also includes the Curve Speed Limiter that reduces the speed in curves for comfortable lateral acceleration. At the end of the curve the car accelerates and resumes the original speed. The driver can change this in increments of 1 or 10 km/h. Acceleration and deceleration in two dynamic settings can be controlled by manipulating the lever on the steering.
Dynamic-Cruise-Control

Brief component description:
Multifunction steering-wheel switch


The multifunction steering wheel contains a horn switch and airbag plus, depending on the model, buttons for controlling the radio, telephone and cruise control. The buttons are split between 2 switch blocks; left and right.

Functional description

The left multifunction steering wheel switch block is directly connected to the right one via a plug connection. This means that all the button signals in the left multifunction steering wheel switch block are detected and digitised in the electronics of the right switch block.

The right multifunction steering wheel switch block sends the signals via the local interconnect network bus to the steering column switch cluster. The steering column switch cluster is the data interface between the local interconnect network bus and FlexRay. All button signals are sent as FlexRay messages.

The right multifunction steering wheel switch block is directly connected to the left one via a ribbon cable.
multifunction-steering-wheel
multifunction-steering-wheel-explain
What is this DIY?

This DIY will guide you on how to change/code the multifunction steering-wheel switch with cruise control function. The bimmer can be either F20/F30 series with automatic air condition.


Part required:


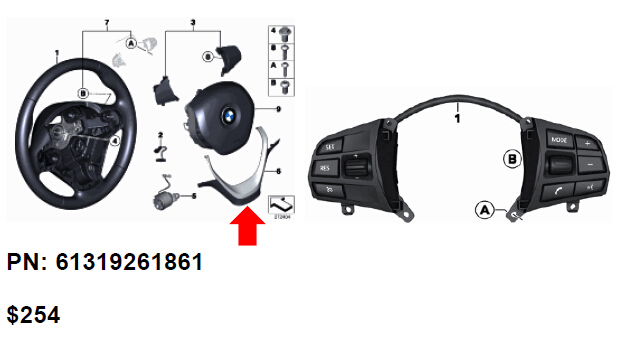
BMW OEM Multi steering-wheel switch

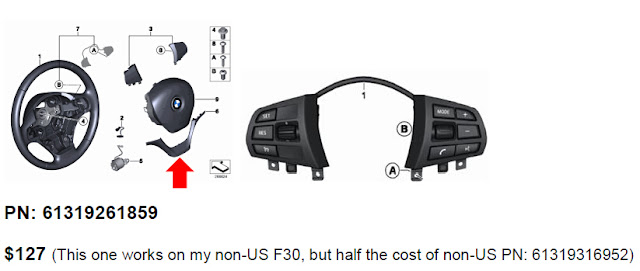
Note the different in the trim piece highlighted by red arrow.

Leather steering wheel
Leather-steering-wheel

Sport leather steering wheel
Sport-leather-steering-wheel

Tools required:


1. Flat head screw driver

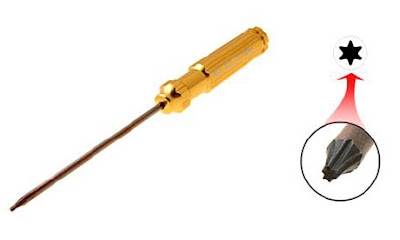
2. Torx screwdriver T10, T20
Torx-screwdriver

3. Computer with esys installed

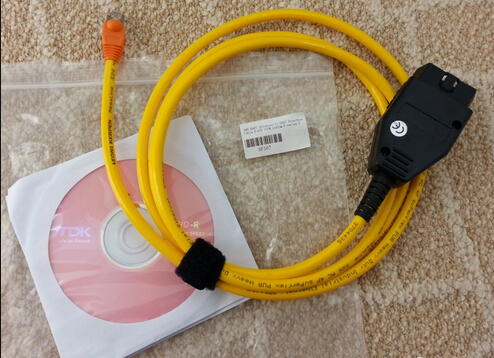
4. BMW ENET cable (Ethernet to OBDII) usb interface
5. ESD strap
ESD-strap

6. Wrench 10 mm


Installation Instruction for Multifunction Steering Wheel Swtich:

There are two ways to remove air bag. I recommend to remove air bag using the below method as it is easier plus it will not leave any mark on the steering wheel. The BMW method is in the appendix, if you desire to do that way. The toughest part of this DIY is getting the air bag out.

1. Disconnect negative battery terminal.

a. This will add safety from unintentional air bag deployment during removal.
Loosen nut (1).

Important!

Do not under any circumstances use force to pull off negative terminal.

Pull off battery earth lead with IBS in an upwards direction, place to one side and secure.
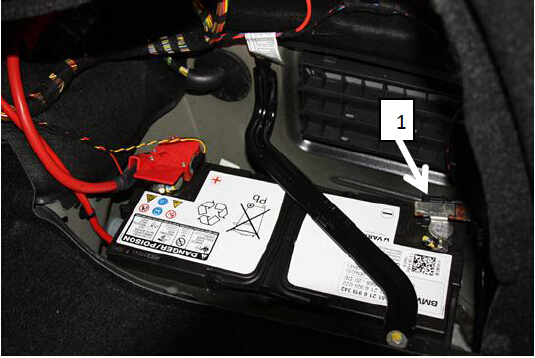
Pull-off-battery
b. Ground your body with car body with ESD strap (if you have one for extra protection)
Ground your body with car body

2. Removing upper section of steering column shroud
Move steering column in "bottom" and "extended" position.
Pull steering column gap cover up carefully and clip out gap cover.
Removing upper section of steering column shroud

Pull steering column shroud (1) up.
Clip steering column gap cover (1) out of steering column shroud upper section.
Important!
Risk of damage!
Carefully pull steering column shroud upper section (1) upward at rear and clip out

upward at rear and clip out

3. Remove lower steering shroud
Press retaining lugs outwards a little and unclip steering column shroud downwards.
Installation note:
Align steering column shroud by means of retaining lugs to steering column and press up as far as it will go.
Press steering column shroud on both sides together a little and then press upwards completely until retaining lugs snap into place.
Check installation position, correct if necessary.

Remove lower steering shroud

Tilt steering column shroud in downward direction.
If necessary, unlock plug connection (1) on steering column adjustment switch and (2) emergency starting aerial and disconnect.
Remove lower section of steering column shroud.

Tilt steering column shroud in downward direction
4. Turn steering 90 degrees to as illustrated below

Turn steering 90 degrees

5. Look back to the steering wheel from behind underneath steering column for the air bag hook as the picture below and use flat head screw driver to pry the hook and pull the air bag up on same side. Once the air bag is release continuing on the other side above the steering column to get the air bag release from both hooks. After remove airbag turns steering back to normal position.
remove airbag turns steering back to normal position

6. Disconnect airbag and multifunction steering switch electrical connectors from the steering wheel.

Disconnect airbag

7. Remove the air bag and put it in an open space with BMW logo facing up.

Remove the air bag

8. Use Torx screw driver to loosen two screws to release the multifunction steering switch and trim from steering wheels.

9. Use Torx screw driver to release multifunction steering switch from the trim pieces (4 screws) and replace with new multifunction steering switch. (Need to transfer one electrical connector from the old switch to the new multifunction switch.)

release multifunction steering switch

10. Reinstall trim piece to steering wheel and route the wire back to steering wheel.
Reinstall trim piece

11. Reconnect the connectors for multifunction switch and air bag and install air bag back by pushing it in until you hear a snap. Check to make sure that air bag is secured firmly.

12. Assemble back the steering column shroud and aerial.

13. Reinstall the steering gap cover.
Reinstall the steering gap cover

14. Move steering column to the normal driving position.

15. Reconnect negative terminal.

16. Press start and check the followings:

a. Illumination lights on multifunction steering switch

b. Check the audio control

c. Press horn to check

d. Check for any fault from the instrument panel. Should be none!

17. Start coding


Coding:

Before you do this coding you must already know how to do coding, please search Google

on how to do or where to get the BMW ENET cable and E-sys software. I only let you know the step and ECU to do

FA coding

FA Coding:

1. Launch esys and connect to your car

2. Select expert mode

3. Read and activate FA (add option 544)

4. Read SVT

5. Select and code the following ECU

a. FEM

b. ICM

c. KOMBI

bmw-f30-coding-with-e-sys

6. If you want “LIM” function, you will need to do FDL coding per the table below. This will

allow “SET” button to act like “LIM” button so that you get both LIM and Cruise control functions.

allow “SET” button to act like “LIM” button

Testing:

1. Start the car and drive away

2. Once on an open road and the speed is greater than 30 km/h press button to turn on cruise control. The cruise indicator should be lit in the instrument cluster.
test-cruise-control

3. Press “Set” to set cruising speed then let go gas pedal, if the car can maintain the speed you all done.

maintain the speed

4. Fine a bridge/slope and check whether the brake is applied when going down to maintain speed.

5. You all set! Consult owner manual for full detail of cruise operating procedure and precaution.


Appendix:

Removing and installing/replacing airbag unit


Warning!
Warning!

Observe the following instructions to avoid any risk of injury by the airbag unit.

-Comply with safety regulations for handling components with gas generators.

-Do not exert any force on the airbag unit.

-Use only specified tools for releasing the airbag unit.

Note: Incorrect handling may result in triggering of the airbag unit and thereby cause serious injury


Necessary preliminary tasks:


 Disconnect battery earth lead


Insert Torx screwdriver T20 (1) vertically into the concealed opening until limit position (2) can be felt.

Pull Torx screwdriver (1) approx. 2-3 mm out of opening. Press screwdriver handle towards middle of steering wheel and simultaneously slide into opening to position Torx screwdriver behind retaining spring bracket (refer to graphic below)

Press screwdriver handle towards middle of steering wheel

Press retaining spring bracket (1) of airbag unit inwards and simultaneously pull airbag unit upwards until it unlocks.

Repeat procedure on other side.


Installation note:

Snap airbag unit with uniform pressing force plane-parallel in direction of steering column shaft into steering wheel.

Warning!

Danger of injury!

The airbag unit may only be set down with the airbag itself facing up.

Snap airbag unit with uniform pressing force

Tilt airbag unit forwards.

Disconnect plug connections (1) and remove airbag unit.

Installation note:

Make sure electrical leads are correctly positioned.

Tilt airbag unit forwards.

Done! Enjoy coding. 

2.09.2017

How to use INPA for BMW F series coding

Yes, INPA software works with BMW Fxx Chassis, so long as you have the Fxx .IPO files installed.

It will use whatever interface you have defined in EDIABAS.ini, so BMW ENET cable is fine. Also, ICOM A2 is definitely ok.

Here is my INPA 5.06 with Fxx Scripts:
 INPA 5.06 with Fxx Scripts

INPA is not updateable with SP=Daten as it uses only the .PRG files in EDIABAS and its own .iPO files.


Here is a full INPA with F and E series for you to download, but no one holds the responsibility for what you will do.

If you don’t wanna take any risk with INPA K+DCAN, here is a tested version for you:

Download full INPA on Mega: (on your own risk)
inpa-full-software
BMW Standard Tools 212 - Install First
  • Includes (EDIABAS v.7.30, Tool32 v.4.03, INPA v.5.06, WinKFP v.5.31 & NCS Expert v.4.01).

INPA_Fxx_v.2 - Install Second
  • Copy INPA_Fxx_v.2 folder to C:\EC-Apps\INPA_Fxx_v.2 and EDIABAS to C:\EDIABAS overriding existing EDIABAS Folder.
  • Run INPALOAD.exe from INPA_Fxx_v.2 BIN folder (C:\EC-Apps\INPA_Fxx_v.2\BIN\INPALOAD.exe).
  • Note: DISABLE WINDOWS FIREWALL ANY ANY VIRUS SOFTWARE.
  • Note: For Exx connection, you will need to change EDIABAS.ini file to "INTERFACE = STD:OBD" and edit OBD.ini Com Port settings accordingly to match you PC's Com Port settings.

The quick diagnose with inpa is much easier and faster than ista/d.... and also for zb-numbers to find...


Files for reference:


2.07.2017

How to choose correct .PRG file in BMW Ediabas Tools32

Which .prg file should you choose for Fxx Jobs in Tool32? This is a short guide of how & which .PRG file to load into Ediabas Tool32 based on your current car.

Disclaimer:  The write-up was made by a Swiss BMW expert. Try at your risk.
Tool needed:
BMW INPA K+DCAN USB cable
INPA & the EDIABAS package which includes Tool32. Search the obdii365 official blog to get some free download resources.

Process:
1. Start BMW INPA software by right-clicking INPALOAD.exe file and selecting ‘Run as administrator’. Load Inpa software.(Fig. 1).
Run as administrator’
2. Select your relevant Fxx car. I.e F10, press F3.
3. The Script selection window will appear. Select the 1st option on the right – FUNCTIONAL JOBS (Fig. 2).
FUNCTIONAL JOBS
4. The Select series (Baureihenauswahl) window will appear. Select F1 (Fig. 3).
Select series (Baureihenauswahl
5. The Job main menu will appear. Select F2 – Identifikation (Fig. 4).
F2 – Identifikation
6. Here you can see the result of my car (Fig. 5). Note I have highlighted in yellow the SGBD column. This is the SGBD name and the .PRG file name that you will need to open in Tool32 for working on your modules.
 .PRG file name
7. Start Tool32 by right-clicking tool32.exe file and selecting ‘Run as administrator’. Tool32 should load.
8. Select File->Load SGBD, Group file.
9. Browse to the EDIABAS\ECU folder, and search for the file name based on the listed yellow column entry. In this example, I’m loading the AIRBAG module file, named ACSM3.PRG (Fig. 6).
AIRBAG module file
10. Once loaded, You will see on the left a list of Jobs available for your module. I have launched the fs_lesen job which is to read the fault memory either double-clicking on it or by selecting it & pressing F5. The Job Results will appear in the window below (Fig. 7).
 Job Results will appear
Please be careful with running Jobs in Ediabas Tool32.
Some Jobs will literally wipe your ECU to a point that only the dealer or even worse – BMW Munich can recover, and to state that it wasn’t your fault will be difficult..
Some wording might not have the context you would expect so research jobs with words like: Initialisierung, Reset, Sperren, Default or Loeschen before you launch them.
In the context of Fault Memory, the Job to clear it is ‘fs_loeschen’.
Hope this helps. Would be great if someone can follow-up with similar instructions for Exx series.

www.autelsale.com


2.03.2017

Free ICOM Rheingold 4.03.31 ISTA-P 3.60.4.000 on Mega

Here is customer share the newest version of BMW ICOM A2 Rheingold 4.03.31+SDP 4.03.30+ISTA-P 3.60.4.000, thanks to beemerboy88 and spider80, good luck and enjoy it on your own risk!

Standalone versions of ISTA-D and ISTA-P.
SQLiteDBs 4.03.30, including RU, EN, DE, OTHER.
BMW ICOM A2 Rheingold 4.03.31 1
BMW ICOM A2 Rheingold 4.03.31-2
Free download link(Mega)

Required interfaces of BMW Rheingold 4.03.31:
BMW INPA K+DCAN USB cable or BMW ENET cable (need special setting)


For unpack archives use 7-zip 16.04 or higher.
All installed and ready to work.
Instructions for installation, configuration and solution of possible errors, is located in the Tools folder (FAQ-RU.pdf and FAQ-EN.pdf).

Read FAQs carefully in Tools folder before ask the questions !!!
ISTA-P – 112 GB
Service Data (SDP) – 70 GB
What’s included in torrent:
included in torrent

1.20.2017

Free Download BMW ICOM Next firmware 3.14.10

BMW ICOM Next A+B+C diagnostic and programming tool is the Latest Generation of ICOM A2 For BMW, MINI, Rolls-Royce BMW-Model. BMW ICOM NEXT newest firmware 3.14.10 is available. There are still many users confuse about how to update ICOM NEXT A+B+C firmware. Here obdii365.com will offer the update tutorial.
 ICOM NEXT A+B+C
First, you need to download the file, they were free, these resource were shared by kind friends on the forum, pleased try it at your own risk, i don’t take responsibility for any damage for your device:
Download ICOM NEXT firmware 3.14.10:
Download ICOM NEXT firmware 3.14.08:
ICOM Image 03.14.08 (Application image+ Firmware image+ ICOM NEXT app .tar.gz+ ICOM NEXT rootfs. tar.gz)

How to update BMW ICOM NEXT firmware?
There are two optional ways for you: one is using ISTA-D, another is by MSI Installer and Web interface.

Option 1. Update BMW ICOM NEXT firmware via ISTA-D:
First, install ISTA-D software on your system so you can use it to install the firmware on your ICOM.
Next, start ISTA-D with ICOM connected to your car (Don’t need KL15, KL30 13.8V on pin 16 and ground on 4+5 is enough)
Then, go to connection manager and start the update.
How to get to the ISTA connection manager?
You can click on the button as following picture shows:

Option 2. Update BMW ICOM NEXT firmware via WIS Installer:
First, install the MSI installer
Next, find the system and application firmware file (.bin for ICOM A1/A2 and .tar.gz for ICOM NEXT) in your installed folder, System = ICOM Next-rootfs-XXXXXX. tar.gz, Application = ICOM Next-app-XXXXXX. tar.gz
Then, upgrade the ICOM firmware by web interface.
Note: For BMW ICOM NEXT firmware, the tarball is in C:\ProgramData\BMW\ISPI\data\TRIC\ICOMNext after you installed the MSI installer.

ICOM NEXT firmware 3.14.10 is tested on forum.
Here is feedback for your reference:
I test it this morning on a CIC of an E90 and an E60. And now also ICOM NEXT is flashing like HELL. So the bug of slow flashing CICR is gone with this upgrade. This I can confirm. THANK, it was long waiting but it was worth it.

http://www.autelsale.com/

1.17.2017

How to change VIN with BMW Ediabas Tool32 (FAQ)

How to change bmw VIN? Any troubles in bmw tool32 change vin? Here are frequently questions and answers help those newbies and ones are puzzled by this issue.

Model: BMW E46 EDC16 DDE 5.0

Ediabas toolset 32 manual of vin change on BMW E46…here you go…

Question: Can I use BMW INPA cable for updating ECU with WinKFP for updating the VIN too?
Answer: Yes, INPA DCAN cable with WinKFP you can make it

Question: But is the INPA K+DCAN cable fast enough for programming?
Answer: Yes, enter your new VIN to WinKFP, and program an update or reprogram the existing file and it will change the VIN.
BUT
Winkfp will only change vin in uif of last programming session.
To change vin use NCS expert or Tool32 (7 or 17+1 simbol(checksum).

Question: When click “Choose ZUSB”, I don’t find that ZB Nr. what ECU has now.7796195
Answer: because is to old sw then your data, so either load old sw in winkfp or just choose “update zusb” instead “choose zusb”, winfp will pick last zbnr for you
Note:
WinKFP only has the current files, it will know all the old numbers, but will not have the data stored.
Use “update ZUSB” to automatically find the best version.

Question: What DDE50x type should I chose after I click Update ZUSB:
DDE502
, DDE503, DDE504, DDE506, DDE507, DDE508
Answer: While using “Update ZUSB” option it does’t matter if you choose wrong family folder (I mean dde502 inspite of dde507 for example). If you want to know exactly which folder to use you can do it qiete easy:
Comfort mode>Update ZUSB> result (it will show you the existing version & the number of soft which winkfp is going to write into your dde).
Comfort mode> Enter ZUSB (put one of the numbers obtained in previous step)>Result: You’ll see in which folder it’s located.
There are lot’ of other ways.

Question: In Ediabas Toolset32, I didn’t find any executable option for VIN change
Answer: Yes…you are right. So no to flash dde you can change it manually using last AIF.
Take all data from job result window after aif lessen and change only vin while aif schrieben.
Ediabas Toolset32

Question: What should I write in arguments line and where to write vin?
Answer:
  1. AIF lessen (you’ll see all the ponts needed while writing)
    2. AIF schrieben (use data which you’ve got while reading but insert your new vin inspite of one you’ve read before). You can see the meanig of arguments in job-info window.

Question: Just write new vin to the result window?
Answer: Not only vin. Look at argument field (VIN/ZUSB/date of prog…and so on)

VIN in ECU solved!!!!
Succeed to change VIN in dashboard dump.

1.06.2017

BMW ICOM NEXT cannot connect to E-sys Solution

I have recently bought an BMW ICOM Next diagnostic emulator and i cannot connect to cars via E-sys.
BMW ICOM Next
I have itool radar installed. I reserved the icom, and when i try to connect the ip adress is automatically inserted under icom/ ethernet, then i hit connect and it says connection failed.

I the port 50160 for ICOM is open, and the icom is working perfectly with ista+ and ista /p.
I’m running ista/d 4.03. and ista /p 3.60.2. It didn’t ask me if i wanted to update icom.
The ip address is showing up as below; that’s ok.
The ip address
Problem solved! The ip address that windows gave to icom from dhcp was different than the icom ip from ista+. I changed the address to the one from ista and it works like a charm.

Here is what i did… to change icom ip…
need a tool like EasyConnect or iToolRadar, both i used
EasyConnect or iToolRadar

connect the BMW ICOM Next A+B+C, turn the ignition on, start f.e. iToolradar.
then the connection from the ICOM (normally on 169.154.92.38), mark it and click on reserve
(in EasyConnect is different but as easy as itoolradar).
as easy as itoolradar
Start E-Sys, choose the target (f.e. F010) and click on “connection ICOM/Ethernet”. Type the IP address (here 169.254.92.38), the port is 50160, so the result should be tcp://169.254.92.38:50160.
connection ICOM/Ethernet
Type the IP address
Connect and have fun.

Need patience to use a bmw icom diag head with E-sys, it’s a 50/50 chance that it will work or not, or, something may not work.