10.14.2016

BMW ICOM and Xprog read write reset update FRM

This is a customer solution on how to use BMW coding software NCS Expert & WinKFP to read/backup bmw cas and frm, how to write win and vo to frm, how to reset frm default and how to update frm. Try at your on risk!

Tools to use:
PC to run Xprog v5.5.5 software, NCS Expert and WinKFP


FRM fix list:
NCS expert read/backup cas and frm
NCS expert write VIN and VO to FRM
NCS expert reset frm default according to VO
WINKFP update frm
WINKFP trying to locate the zb or zusb


NCS expert read/backup cas and frm
goto work folder delete nettodat.trc and fsw_psw.trc
file
load profile
expert
f1 fg/zcs/fa
f3 zcs/fa f. ecu
r56
cas
f6 back
f4 process ecu
cas
f2 change job
codierdaten_lesen (reads coding from ecu)
f4 reading ecu
goto work folder move nettodat.trc and fsw_psw.trc to a new folder CAS Original make files read only
f1 change ecu
frm
f4 reading ecu
goto work folder move nettodat.trc and fsw_psw.trc to a new folder FRM Original make files read only


NCS expert write VIN and VO to FRM
file
load profile
expert
f1 fg/zcs/fa
f3 zcs/fa f. ecu
r56
cas
f6 back
f4 process ecu
frm
f2 change job
fa_write (writes FA aka VO to ecu)
f3 execute job
f2 change job
fgnr_schreiben (writes FG aka VIN to ecu)
f3 execute job


NCS expert reset frm default according to VO
goto work folder delete nettodat.trc and fsw_psw.trc
file
load profile
expert
file
edit profile
click FSW/PSW
uncheck FSW-/PSW-Manipulate with FSW_PSW.MAN
OK
OK
f1 fg/zcs/fa
f3 zcs/fa f. ecu
r56
cas
f6 back
f4 process ecu
frm
f2 change job
sg_codierren (writes coding to ecu)
f3 execute job


WINKFP update frm
f1 Comfort mode
f3 update ZUSB pick FRMR3
f4 enter vin
f8 done
f3 prog. zb-update
I don’t remember the rest from here but it updates the FRM. It takes 5-10 minutes and there is a progress bar.


If WINKFP update frm doesn’t work.
Updating WINKFP using BMW Coding Tool
extract the datens for your chasis into a folder
open BMW coding tool
select sp-source
choose the folder with the extracted datens
update WinKFP


WINKFP trying to locate the zb or zusb
(I don’t know)
f1 Comfort mode
f3 update ZUSB pick FRMR3
f4 enter vin
f8 done
f5 diagnosis
f1 ecu status
f2 ecu ident

Related document:

10.12.2016

ICOM and Xprog fixed FRM3 module on BMW R56

Successfully repaired my dead FRM3 model on my BMW R56, with the MINIMUM cost (xprog and BMW ICOM Winkfp)! Here, i wanna share something useful with you all.xprog
Note: The setup below did work for me, but i’m not sure of yours. You are at your risk.

My model:
2011 BMW R56

Reason for FRM repair:
I disconnected the battery and the DME to change the thermostat and when I put it back together the FRM was dead.

Tool i used:Except the BMW ICOM A2 emulator plus ISTA+ I had, i also was shopping for xprog v5.55 boxes from
Before this whole ordeal of the junk BMW/MINI FRM dying the only software I used was playing with was Carly for iOS and Dashcommand. But cannot solve issues.

BKGD location:
BKGD is on the HC(S)12 BDM adapter in the attached photo.
Vdd(+5V) = Vcc
RESET = B5
BKGD = B3
GND = GND (do not use the GND that is B0)
I think since we are not using the XCLKS and EXTAL flashing works with or without the BDM adapter.
Xprog m software installation:
I was not able to get this software to work with windows 7 64-bit. I was lucky enough to have an old HDD with windows 7 32-bit.
Before plugging in the xprog hardware go to system properties and change the device installation settings to never install driver software from windows update.
Xprog and FRM fix using Xprog:Once the software was setup I hooked up the frm to the xprog and tried to make a backup of the existing EPROM via the MCU/MPU -> Freescale 9S12XE -> MC9s12XEQ384_EEE profile. Error partition corrupted. Set the sector to 16. I also made a backup of the existing P-FLASH via the MCU/MPU -> Freescale 9S12XE -> MC9s12XEQ384_P-FLASH profile. I think I got errors the first few times I tried to do this but restarting the program resolved the error.
In the MCU/MPU -> Freescale 9S12XE -> MC9s12XEQ384_EEE profile: erase, blank, open good EEE dump, write, verify, close, new, read.
This took several tries because the read back was still showing as blank.
I removed the BDM adapter and went direct into the xprog box. I also closed the program and reopened it when it kept giving me errors. After I was able to get a good write to the FRM I installed it back into the car and it was working again with a couple of errors (xenon high beam failure and fog light failure).

NCS expert & WINKFP setup for FRM:In NCS expert I backed up the FRM, changed the VO and VIN, reset the FRM to factory and still had the high beam and fog errors. I proceeded to WINKFP to update the FRM and none of the ZB-numbers for my ECU worked. I updated WINKFP with BMW coding tool and the list of available ZB-numbers changed. After WINKFP was able to update the FRM I went back to NCS Expert and copied the VO from the CAS to the FRM and then set the FRM back to defaults. Everything was fixed. Fired up ISTA+ and cleared fault memory.

SOLVED!Afterwards I hooked the frm back to the xprog and made a backup of the EEE and pflash.
My FRM:R56 HIGH EKS 35 frm3r pl3 6135 3456395 01 23994322 sw141030 hw07 5324828c5
mc9s12xeq384mag
3m25j
Internet file:R56 HIGH EKS 35 frm3r pl3 6135 3456987 01 23994322 sw156033 hw11 5324828r5
According to realoem parts 61353456395 and 61353456987 are Bilaterally exchangeable.
http://www.realoem.com/bmw/enUS/partsearch?id=SV33-USA-08-2010-R56N-Mini-Cooper_S&diagId=61_2102&q=61353456395
xprog-repair-frm3-1 xprog-repair-frm3-2 xprog-repair-frm3-3 xprog-repair-frm3-4
Hopefully this demonstrates to people it’s possible to repair these modules with the minimum cost.

10.11.2016

Free download ICOM ISTA-P 3.59 EN software

ISTA-P software 3.59 can be downloaded free here. ISTA-P is multilingual, so software is EN.


ISTA-P En version .exe


version 3.59.0.600


paste the 2 files in a directory and run the .exe


a phone and loader


Access to ista-P file


More features


BMW_ISPI_ISTA-P_SYS_3.59.0.600


the executable file
BMW_ISPI_ISTA-P_SYS_3.59.0.600.exe
https://mega.nz/#!Op1yTBiQ!_CW3hVON378zRRmE2Nq-6z-dwZXM3SyF0ZKO8RgA9FY

BMW_ISPI_ISTA-P_SYS_3.59.0.600.msi
https://mega.nz/#!5hUG1aaY!ghwQ6qbvL86bk-HgaYCVeNB2Y6v6DA66GnZemffxu7c


the file
BMW_ISPI_ISTA-P_DAT_3.59.0.600.istap

https://mega.nz/#!AsIjWbaK!DH4dm8nJYXY_aYq8ecNIDGW88yUcqgBlvm6ZMjUkbtc
_______________________________________________________________________

BMW_ISPI_ISTA-P_SYS_3.59.1.003

BMW_ISPI_ISTA-P_SYS_3.59.1.003.exe

https://mega.nz/#!DscHAQAQ!2BZhJT8tLyd6TE-Uq7fHlV7SP9PzgSfIwP9WJQz6Vhw


BMW_ISPI_ISTA-P_DAT_3.59.1.003.istap

https://mega.nz/#!X89RRRxJ!5Fgtgltue0gPgEeKCF4FYx7YcWq4XV1oq2oEsPKhwBY
And the SHIFT 3.59.1.003

https://mega.nz/#!glNUwRaI!78cuc5PXqJTHqaGGUaatU95Zp94XlNDP8Cxe3trc9lY

10.10.2016

Recover BMW E84 FRM by Ncs Expert and Xprog

It’s an awesome guide that is a walk in the park. Helpful to those want to recover/resurrect BMW FRM model.


Model: BMW E84

ZB number: 9230450
bmw-e84-frm

Car condition:
The car has a 5year/125k miles warranty here. This car had 126k miles and 5 years and a couple of months now that the high pressure diesel pump and FMR module failed in the same month. Was horrible timing to break down on the road.

Tool solution (Xprog):
Got the Xprog-m box ecu programmer and I installed it with installing adobe, using the .reg file to mod the register and then I moved the xprog into C: drive and plugged in the module. I manually selected the win xp32bit drivers and it installed 2x drivers.

First try:Then I opened Xprog m programmer and selected com11 and tried to do a read of a Atmel AT93C66 Serial EEprom like all the vidoes (without sound ofc..) is doing as I assumed it’s reading a test ecu or smt inside the xprog. It failed and said bad conenction on pin XXXX. Maybe my assumption wrong so that I actually have to conenct this AT93C66 to the xprog to do the test. I’m not sure. If so I’ll just test it with the MCU but I didn’t want him to drive all the way to my place just to find out that I didn’t have a working install of Xprog..

Final try- SUCCESS!Connected the Xprog-m and it worked at first try to read out p-data. EEPROM was corrupt so it didn’t read out. Used a FRM .bin file from the first post and flashed EEPROM and p-data, did a readout and used beyond compare to compare the readout with the file I flashed and it was identical. Installed it in the car and had a few error messages but it lighted up and things started working again. I went into Winkfp hit update zusb, input the VIN and flashed. Opened Ncs expert software in expert mode, opened CAS to get vo/vin and hit “back” button to select NFRM and executed sg_codieren to code it with vo/vin. No errors and everything worked afterwards.

Hopefully, it helps someone.

10.06.2016

How to install ISTA v4.01.22 Voltage Control tool

Here is a DIY guide on setting up BMW ICOM ISTA+ BMW v4.01.22 Voltage Control tool. Simulates voltage of connected interface.
voltage-new
Free download Voltage Control tool:
Voltage Control tool for standalone ISTA 4.01.22
Voltage Control tool (+ HW mod) for standalone ISTA 4.01.22
password: beemerboy88


Installation instructions:Unblock archive and extract files to \testergui\bin\release.
Create desktop shortcut for the voltage tool.

How to use:Start ISTA software first (if problems try running as admin).
Run voltage control tool.

Notes:Default voltage on startup is 14V.
Shutdown the control tool to restore real time voltage monitoring.
ista-voltage-control-1
ista-voltage-control-2
ista-voltage-control-3
ista-voltage-control-4


9.28.2016

DIY set up INPA Ncs expert and K+DCAN cable

Here is my own DIY guide on setting up BMW INPA, Ncs Expert software and INPA K+DCAN cable.


First off, you will need a windows computer or Virtual Box from Oracle, (what I used). I used a licensed copy of windows XP and installed it. You can use Windows 7, 8, and 10 as well, but you will need to research some things to makes sure everything works properly!!!


You will need a cable:

Option 1: K+DCAN USB cable for coding:


This is similar to what I bought, it came with a green circuit board and worked well.
http://www.obdii365.com/wholesale/bmw-inpa-k-can-with-ft232rq-chip.html


OPTION 2:
 BMW ICOM

****NOTE if you plan on updating modules in your car, buy an ICOM cable. It will have a faster and more reliable connection. 


If continuing with K+DCAN...

Download BMW tools 2.12 this will give you updated NCS Expert @ v3.1, EDIABAS 7.2, and winkfp 5.1. Then, I used the BMW coding tool to update my daten files.


After this you will likely need to update your: SP-DATEN files. This is so you don't have strange errors and so you can code your car back to default using the "expert mode profile."
There is newer SP-DATEN than v54.
This is from 2014, I just done have time to keep searching. Feel free to post links to newer versions here guys!!!!

Link for: v54: https://mega.nz/#F!0N8A3LSb!kPyNeBaKoO1GaGoSokfuJA

This is a large file, about 16 GB and will take some time. It contains, what is know as SP-DATEN update files for all BMW models and MINI models. Just pick you chassis and follow the following procedure to update that to the car. After the download you will need to unzip it.

***Use "7zip" found here: http://www.7-zip.org/download.html ***

*****Winzip is unable to handle such large files*****

**After it is unzipped it is a: ".rar" You must now "unrar: it, Here is a link to Unrar a file:http://www.rarlab.com/rar_add.htm **


After that you will have the folders, feel free to delete the ".zip" and all the ".rar" files. You can also delete all other chassis except what you need for your car. Now use the BMW coding tool to update the SP-DATEN files to NCS Expert and the EDIBAS.


Now once you have done the other steps and are thinking, how do I actually code something?

You can watch this video, it has a great explanation with some details on exactly what to do. This has to do with reactivating "Passive Go or Keyless Go," with respect to the CAS "Car Access System" and Comfort Access. Watch it here.
https://www.youtube.com/watch?v=p9QizWwtI-g

9.27.2016

BMW F11 520D ECU Upgrade by ENET E-sys

Here is the tutorial on BMW F10 or F11 520D ECU upgrade by using E-sys coding software. This guide should work for all Fxx chassis.

Disclaimer: We are not hold the responsibility of your damage.
Remember always to create a backups before starting an endeavour like this!

Preparation:
BMW ENET cable (Ethernet to OBD) interface with E-Sys 3.26.0 and PsdZData files (54.0 is used in this guide).
It’s important that the PsdZData files are the FULL version as the Lite version does not include all necessities for flashing.
E-Sys 3.26.0 is used for screen dumps. Other versions may differ slightly.
In this guide, We’ll be upgrading these ECU’s:
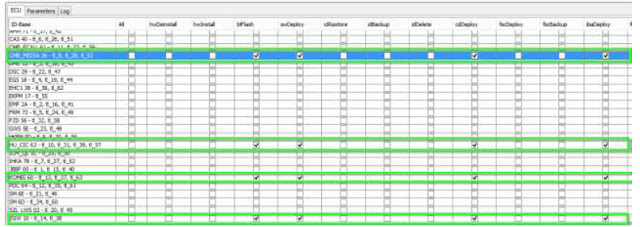
 CMB_MEDIA
 HU_CIC
 KOMBI
 ZGW
The steps for upgrading other ECU’s should be the same as doing these four. Just remember to identify the dependencies and select appropriately in step 15 in the below procedure.
When flashing involves ZGW it is widely said that the ZGW module should be updated BEFORE other modules. The TAL (transaction list) generated by E-Sysshould take care of this. But if you want, you could
flash the ZGW all by itself and then restart and do the rest. The steps remain the same.
Flashing all modules at once is also as easy as flashing individual modules. Just select all the modules in step 15 (still blFlash, swDeploy, cdDeploy, and ibaDeploy columns)
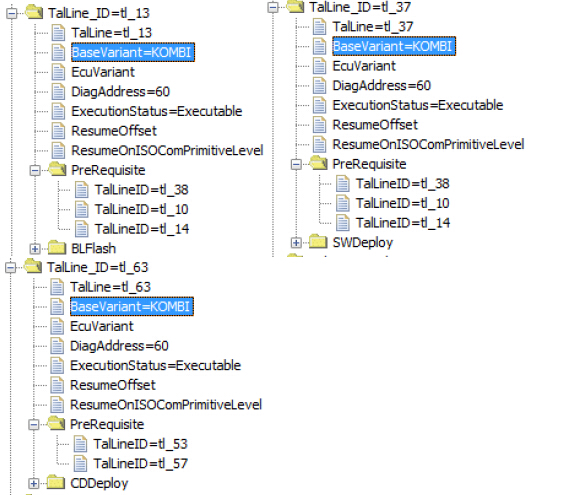
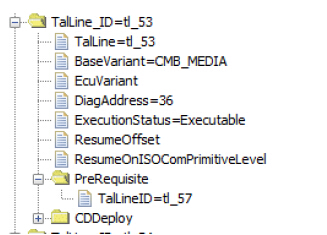
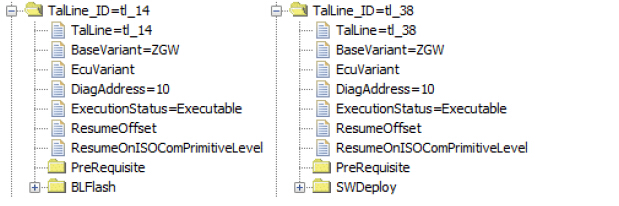
HU_CIC Depends (PreRequisites) on: 38 + 14 (BOTH ZGW) KOMBI Depends on: 38 + 10 + 14 + 53 + 57 (ZGW + HU_CIC + ZGW + CMB_MEDIA + HU_CIC)CMB_MEDIA Depends on: 57 (HU_CIC) ZGW does not have dependencies.
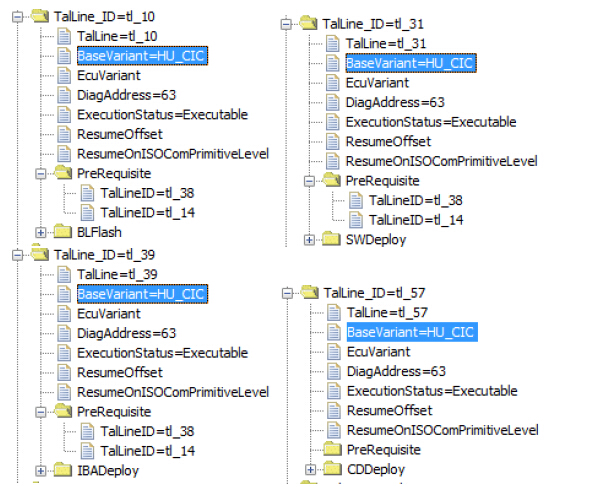

HU_CIC:


KOMBI:


CMB_MEDIA:


ZGW:


Basic steps:

1. Connect external charger (at least 50AMPs, preferably 70AMPs) to the car battery. Connect laptop to power supply. This step is essential!

2. Turn lamp switch to parking light – this will keep the ignition on beyond 20 minutes.

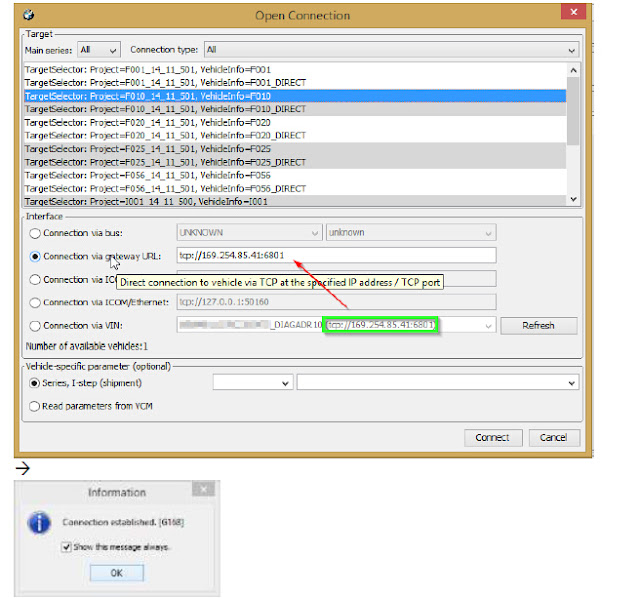
3. Connect via “Connection via Gateway URL” instead of via VIN, and use the car’s IP address with the default port number 6801.
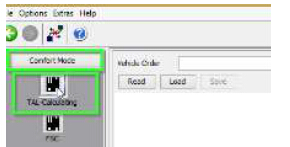
4. Select Comfort Mode > TAL Calculating

5. Read and save FA
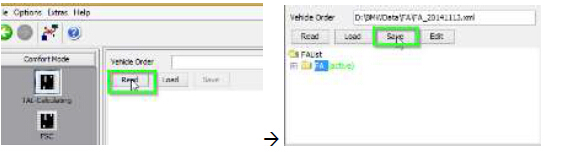

6. Activate FA
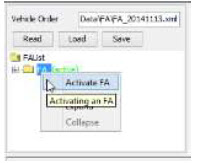

7. Read and save SVT Actual as “SVT_ist”


8. Create an SVT Target:
a. Select Complete Flash
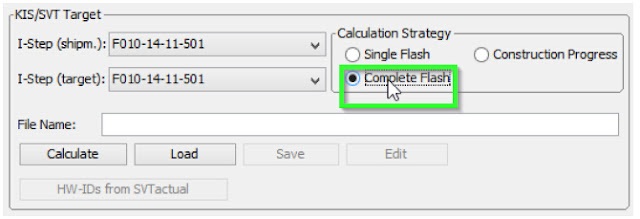
b. Select I-Step (shipm.) to match vehicles shipment I-Step level

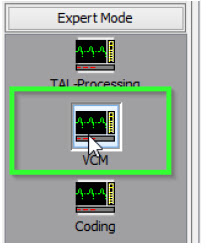
i. Select Expert Mode VCM button

ii. On the right bottom box, select “Master” tab
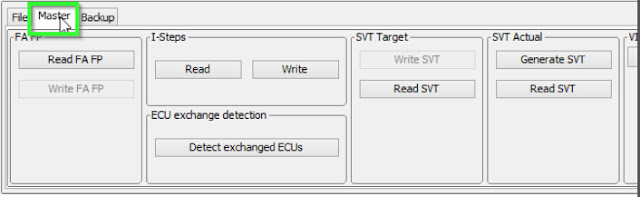

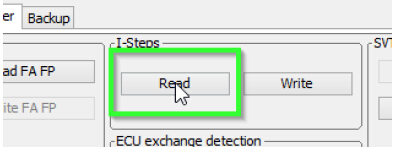
iii. In I-Steps box, click on “Read” button.


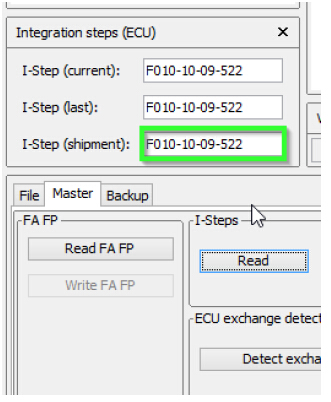
iv. Integration Steps boxes above will be populated with the data. Note down the IStep (Shipment).
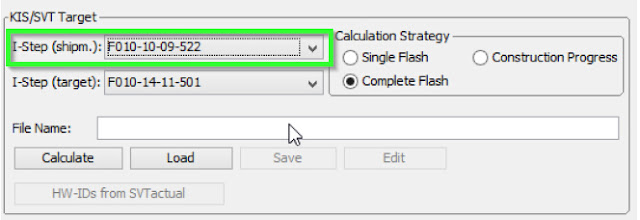
c. I-Step (target.) will be unselectable as it is fixed based on current PSdZData I-Level. Select the appropriate level in I-Step (shipm.) as obtained in step above

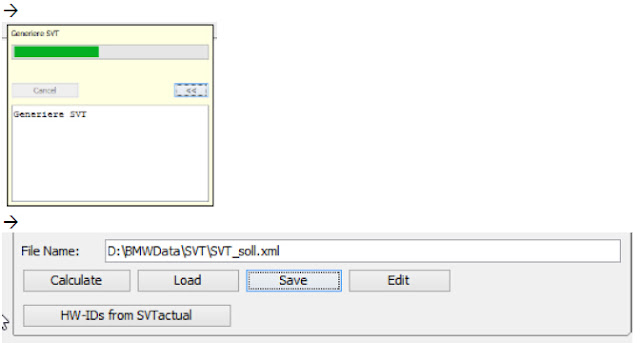
d. Do a KIS/SVT Target Calculation and Save as “SVT_soll”
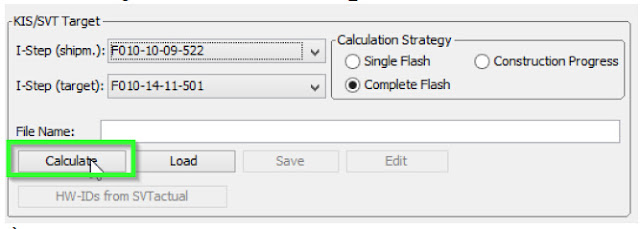


e. Do a TAL Calculation and Save as “SVT_tal”
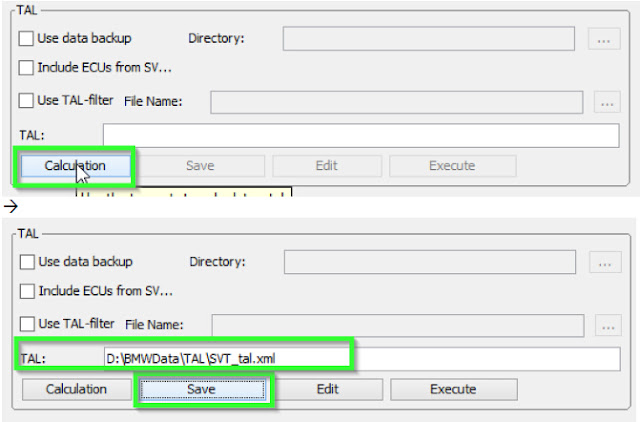


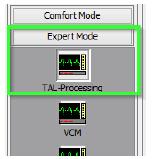
9. Go to Expert Mode > TAL-Processing


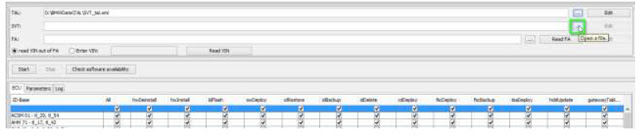
10. Load TAL [SVT_tal) created in step 8.e



11. Load SVT Target (“SVT_soll”) created in step 8.d


12. Click the “Read FA” button
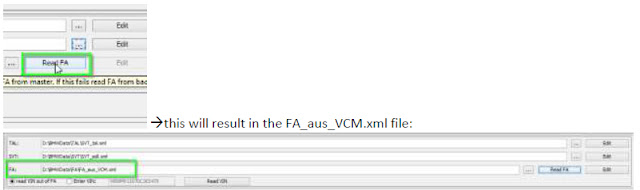

13. Check radio button for “read VIN out of FA” and click the “Read VIN” button


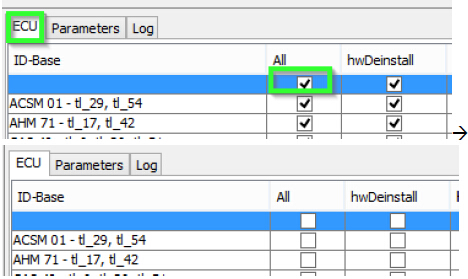
14. On ECU Tab, uncheck let top box in column “All” (All checked boxes should toggle to unchecked)


15. On ID Base Row for HU_CIC, CMB_MEDIA, KOMBI and ZGW check the boxes in blFlash, swDeploy,cdDeploy, and ibaDeploy (please see Appendix C) columns.

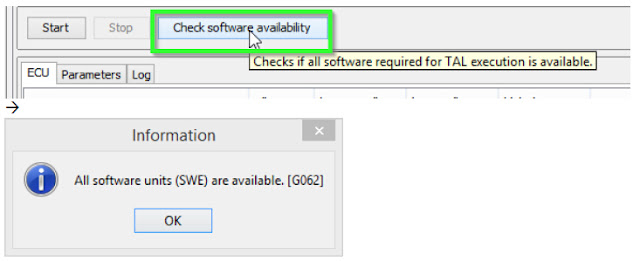
16. Press Check software availability (this, among other, ensures that you have the correct PSdZdata and the FULL version of them)

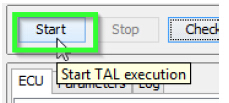
17. Press Start and it will proceed with processing TAL to flash Kombi with new firmware


18. Cross your fingers and watch it work.

Troubleshooting
If coding ACSM, the airbag needs be locked. This can be done by using the following procedure:
E-Sys Transmitter:
1) Click “External Applications” in the left menu.
2) Click “External Application”
3) Double-click “Transmitter”
4) Double-click “ACSM verriegelung_schreiben”

Appendix A – list of ECU’s
AAG – Trailer Hitch Module
ACC – Active Cruise Control
ACSM – Advanced Crash and Safety Management
AHM – Trailer module
AMP – Amplifier
AMPH – HiFi Amplifier
AMP_TOPHB – Top HiFi Amplifier/System
AMP – Amplifier/System
AMP_TOPHB – Top HiFi Amplifier/System
ASA – Active steering
ASD – Active Sound
BDC – Body Domain Controller (ZGW, FEM, REM, SZL, IHKA, TCB, CAS, JBBF Combined)
CAS – Car Access System
CID – Central Information Display
CMB_ECALL – Combox Emergency Caller
CMB_MEDIA – Combox Media
CVM – Soft top module (Convertable Top)
DKOMBI – MFID Instrument cluster (6WB)
DDE – Digiatl Diesel Electronics
DME – Digital Motor Electronics
DSC – Dynamic Stability Control
DWA – Immobilizer (Alarm)
DVDC – DVD Changer
EGS – Electronic Transmission Control Unit
EHA – Electronic ride-height control
EHC – Electronic ride-height control
EKPM – Electronic fuel pump control
EMF – Electromechanical parking brake
EPS – Electronic power steering
FEM_BODY – Front electronics module (ZGW, FRM, CAS, and JBBF Combined)
FEM_GW – Front electronics module gateway
FKA – Rear-cabin automatic A/C
FLA – Automatic High Beam Camera Only
FRM – Footwell module (Lighting)
FRR – Active cruise control
FZD – Function unit roof
GWS – Gear selection switch
HKFM – Rear Lift-Lid (Trunk)
HKL – Rear Lift-Lid (Trunk)
HU_ENTRY – Head Unit Entry Level (no iDrive System)
HU_CHAMP (Head Unit CIC Mid) (iDrive system)
HU_CIC – Head Unit CIC High (iDrive system)
HU_NBT – Head Unit NBT (iDrive system)
HC2 – Lane Change Warning
HUD – Heads-Up Display
ICM_QL – Integrated Chassis Management
ICM_V – Integrated Chassis Management Vertical (Vertical dynamics management)
IHKA – Integrated automatic heating/air conditioning system
JBBF – Junction box electronics
JBE – Junction box electronics
KAFAS – Cameras System (LDW, AHB, SLI)
KOMBI – Instrument cluster
LHM – LED Headlights main light modules (fan and LEDs for the cornering light, low-beam and high-beam
headlights).
NIVI – Night Vision Camera
PDC – Park distance control
PMA2 – Parking Assist
RDC – Tyre pressure control
REM – Rear Electronics Module
RSE – Rear Seat Entertainment
SM – Seat module / Seat Memory
SME – Accumulator-management electronics
SMBF – Seat module / Seat Memory Passenger
SZL_LWS – Steering column control unit
SVT – Servotronic
TCB – Telematics Communications Box (BMW Assist)
TMS – LED Headlights (stepper motors for the Adaptive LED Headlights and LEDs for the side marker light,
the positioning light and the turn indicator)
TRSVC -All around view camera
TBX – iDrive Controller Touch Handwriting Module
VDM – Vertical dynamics Management
ZBE – iDrive Controller
ZGW – Central gateway module

Appendix B
On new cars (7/2014 F30) the ignition will not stay on even if you turn light switch. After 15 minutes or so ignition will turn off. This is not a problem though, just remember to cycle ignition before svt soll calculation and before starting TAL processing (actual flash). Ignition will stay on as long as the TAL is running.